Pages

.

‘Only’ Event Announcement For January’13

 
Hi all!!
Wish you all a very Happy New year. I hope and pray that the New Year brings peace and harmony in this world. I also pray that this world is a better place for women to live and travel safely. Also, I use this platform to criticize those men who act as beasts and treat women like a piece of toy. I also hope that stringent laws are made against such social beasts this year in India.
Coming back to food.. We all love food and we all love to binge on tasty food, and for me no food is tastier than the street food. We have had a tongue tickling  ‘Only’ event earlier on Chaats where we all bloggers shared our recipes ..This time of the year where we  start afresh with new set of New Year resolutions, my one of the resolutions is definitely to try more of other cuisines and tickle my tongue further. And I’m asking all the food bloggers to join in my resolution and try more of international cuisines.
The best way to try international cuisine is to taste the street foods. So many international street foods have become so popular in India, to name a few which are commonly available are the falafel, pita bread sandwiches, hakka noodles, shawarma rolls, som tam, dimsum, spring rolls and so on.. This event will give all of us a platform to try and indulge in more international street foods and also explore recipes which are still not commonly known or popular.
To help me conduct this event is a guest host Archana from Mad Scientist’s Kitchen. Check out her page for more details.
clip_image002
To encourage us to cook, www.tarladalal.com has sponsored the cookbook ‘Fast Foods Made Healthy’ for the winner of this event. The book will get shipped only in India. The cookbook winner can be any participant who is a follower of my blog publically and also likes my page on face book.
clip_image003


reade more... Résuméabuiyad

Baby Taro Roast


          I love baby vegetables, like potatoes, carrots and eggplants, I can't resist myself from picking up a bag of baby potatoes when I see them. The other day I saw this baby taro/colocasia, they looked so cute and since I don't see them that often like the potatoes, I picked a bag. I just made this simple roast with it, goes very well rice and dal or sambar saadam and looks very appetizing..

Need To Have

  • Baby Colocasia - 2 cups boiled and peeled
  • Turmeric Powder - 1/4 teaspoon
  • Red Chilly Powder - 1 teaspoon
  • Asafoetida - 1/4 teaspoon
  • Curry Leaves - 10 to 15
  • Mustard Seeds - 1/2 teaspoon
  • Urad Dal/Black Gram - 1 teaspoon
  • Salt - to taste

Method


          Heat oil, add the urad dal and mustard seeds, when it starts spluttering add the boiled and peeled colocasia and mix. Then add the asafoetida, turmeric and chilly powders and salt.


           Mix it, add some oil all around and roast it on low heat. When you start seeing brown spots, add the curry leaves and roast for a few more minutes, remove and serve it warm with rice and dal.


Note
Cook the colocasia with lots of water on stove top, till the outer skin is loose enough to peel and also the vegetable is slightly soft to touch.
But don't overcook, it'll become mushy.
Since this vegetable is more sticky it'll require a little more oil than the regular potatoes.
reade more... Résuméabuiyad

Cabbage Pongal/Khichdi


          My daughter has started wearing braces, the first couple of days, she had to eat something soft. I had to make something that was easy for her to eat and at the same time nutritious too. This Cabbage Pongal is made with rice, split moong dal with skin and cabbage, rich in fiber, protein and other nutrients. An healthy one pot meal, very easy to make, yet very tasty one..

Need To Have

  • Raw Rice - 1/2 cup
  • Split Moong Dal/Green Gram With Skin - 1/4 cup
  • Shredded Cabbage - 2 cups
  • Cashew Pieces - 1 tablespoon
  • Cumin Seeds - 1 teaspoon
  • Black Peppercorns - 1 teaspoon
  • Curry Leaves - 10 - 15 
  • Grated Coconut - 1 tablespoon
  • Turmeric Powder - 1/4 teaspoon
  • Salt - to taste
Method


          Pressure cook the rice along with the split green gram, cabbage and turmeric powder. Coarsely powder the cumin seeds and black pepper.


          Heat some oil, add the cashew pieces, saute till it turns golden, then add the powder, curry leaves, saute for a minute.


          Finally add the grated coconut and mix it for a minute. Add this to the cooked rice mixture, mix it well and serve it warm.


Note
The time taken to cook raw rice, green gram and cabbage is about 8 to 10 minutes.
Can do the same with moong dal without the skin, but it's more nutritious with the skin.
Cook the rice mixture with three times water.
Can also add a tablespoon of grated ginger while sauteing, gives nice flavor, I forgot it.
reade more... Résuméabuiyad

Brownie Cookies


          Merry Christmas ! It's cakes and cookies time, I was not able to bake anything elaborate, but I made these brownie cookies. They are very easy to make, the baking time is very less and they turned out really well. These tasted a lot like brownies, hence the name. This is for all the cookie and chocolate lovers out there..

Need To Have

  • All Purpose Flour - 1 cup
  • Sugar - 3/4 cup
  • Butter - 4 tablespoons
  • Cocoa Powder - 1/4 cup
  • Baking Powder - 1/2 teaspoon
  • Milk - 4 - 5 tablespoons 
  • Dark Chocolate - 80 gms, broken into small pieces
Method


          Sieve the all purpose flour, cocoa powder and baking powder. Melt the butter. Add the sugar and mix well. Then add the sifted flour mixture.


          Adding the milk, bring it together to form a cookie dough. Make small balls out of it.


          Flatten a ball, place 2 small pieces of chocolate, roll it back and flatten slightly. Arrange on a greased cookie tray and bake at 180 C for 15 to 20 mins. Cool slightly and remove. Cool completely and serve as such or with some vanilla ice cream.


Note
Place 1 or 2 pieces of chocolate, depending on how chocolaty you want the cookies.
The baking time also varies, depending on the oven and also on how soft you want the cookies, baking for a longer time makes the cookies more harder.
reade more... Résuméabuiyad

Three Cheese Elbow Pasta


          My daughter's favorite restaurant is the Olive Gardens (back in US), and the dish that she orders almost every time we went there is the Five Cheese Ziti Pasta. Now we are in India and she misses the Italian food. This week she is getting her braces done, and one of the foods that she cannot have much after that is cheese, which she loves. So, for the past few days it has been all pasta and pizza. I made her this Three Cheese Elbow Pasta, named so, because I had used multi grain elbow pasta and the three variety of cheese that I had. It is a very easy dish, even kids can put it together, tasted very good, my daughter's verdict was, ' tastes close to the Five Cheese Pasta', well, what more can I ask for..

Need To Have

  • Multi Grain Elbow Pasta - 1 + 1/2 cup
  • Pasta Sauce - 5 to 6 tablespoon
  • Grated Parmesan Cheese - 3 tablespoons
  • Grated Cheddar Cheese - 3 tablespoons
  • Mozarella Cheese - same amount as the above cheese
  • Dried Oregano - 1/2 teaspoon
  • Salt & Pepper - to taste

Method


          Cook the pasta as per the instructions on the box. Drain, mix in the pasta sauce, microwave for 2 minutes. Remove, add the oregano powder, pepper, salt, the grated parmesan and cheddar, mix, add the mozarella slices on the top and microwave for another 2 minutes or till the cheese melts. Serve it warm.


Note
Once the pasta is cooked, you can do the last part- mixing in the cheese and microwaving in separate bowls and serve them.
The amount of cheese added depends on individual preference, I had added a little more of each cheese and microwaved it separately for my daughter.
You can use any kind of pasta.
I had used Kraft Parmesan, local Cheddar from Auroville and Amul Frozen Mozarella.
reade more... Résuméabuiyad

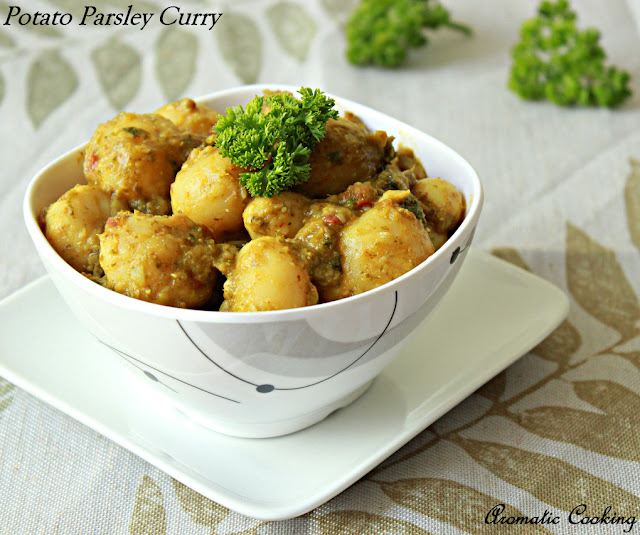
Potato Parsley Curry


          Whenever I go to Nilgiris in Chennai for my grocery shopping, I stop by the vegetable shop, that's close to it, mainly to pick up some basil or broccoli or zucchini, which are not available at all the vegetable shops. This time, they didn't have basil but they had parsley and it was really fresh, so I picked up some. I have a couple of recipes that I have posted with parsley, but none of them are curries, and this time I wanted to do a gravy dish with it along with potatoes. I started doing it, with no idea about, how it was going to taste or smell (parsley has a strong flavor). But then, the final dish turned out too good, it went very well with rotis, it should also taste equally good with all pilafs. Give this a try, the next time you get some parsley..

Need To Have

  • Baby Potatoes - 2 cups, boiled and peeled
  • Onion - 1 medium, chopped
  • Turmeric Powder - 1/4 teaspoon
  • Red Chilly Powder - 1/2 teaspoon
  • Coriander Powder - 1 teaspoon
  • Tomato - 1 small, chopped
  • Chopped Parsley - 1 tablespoon to garnish
  • Salt - to taste

To Grind

  • Parsley - 1/2 cup
  • Grated Ginger - 2 teaspoons
  • Cashews - 5

Method


          Grind all the ingredients given under 'to grind'. Heat some oil, add the onions, saute till it turns pink, then add the potatoes an mix. Now add the salt, turmeric, red chilly and coriander powders, saute for 3 minutes. Then add the chopped tomatoes and cook for another 2 minutes.


          Finally add the ground paste and some water ( about 1/2 cup, depending on how thick you want the curry). Simmer for another 5 minutes, switch off and garnish with the chopped parsley and serve it warm.


Note
Since the potatoes are already cooked, the curry is cooked without the lid on.
Feel free to increase or decrease the amount of chilly powder added according to your spice level.
The curry thickens slightly when it turns cold, so add water accordingly.
You can use regular potatoes too, but don't use the ones that you use for mashed potatoes.
reade more... Résuméabuiyad

Chana Dal Sundal/Split Chickpeas


          I wish I could be a little more organised, have my posts ready, a week in advance, take part in events, but nothing seems to work, I am always this 'last minute' person, I edit my pictures, write and post, all on the same day. Since the next few days are going to be a little busy, I am going to keep my posts, all easy and simple. For today's post I chose this simple Chana Dal Sundal, a common snack during the Navarathiri season and a very healthy one, can also have it as a side dish with rice and some spicy kuzhambu like the Kathrikkai Kuzhambu and Poondu Kuzhambu..

Need To Have

  • Chana Dal - 1/3 cup
  • Dry Red Chilly - 1 broken into two halves
  • Mustard Seeds - 1/2 teaspoon
  • Asafoetida - 1/4 teaspoon
  • Turmeric Powder - 1/4 teaspoon
  • Grated Coconut - 1 tablespoon
  • Curry Leaves - 5 or 6
  • Salt - to taste

Method


          Cook the chana dal with the turmeric powder and salt, either use the pressure cooker or on stove top.  I did it on stove top.


          Heat some oil, add the mustard seeds and red chilly, once it starts spluttering add the asafoetida and curry leaves, saute for 1/2 a minute. Then add the cooked chana dal and mix. Lastly add the grated coconut and mix well and serve it warm.


Note
If cooking on stove up, soak the chana dal for at least an hour, it'll save some cooking time.
The dal should be soft when pressed between the fingers, but also do not make it mushy.
Chana Dal is split brown chickpeas.
reade more... Résuméabuiyad

Cauliflower And Soy Roast


          Cauliflower and Soy Roast, this is yet another easy and very tasty side dish that goes well with almost anything. I need not go into the nutritional value of soy, a good source of protein - to say the least. Cauliflower pairs with it very well, and the ground masala that I have used gives a nice taste to the otherwise bland soy chunks, give it a try, you'll like it..

Need To Have

  • Cauliflower - 1 small
  • Soy Chunks - 1 cup
  • Dry Red Chilly - 1
  • Curry Leaves - 10 - 15
  • Salt - to taste

To Grind

  • Onion - 1 medium
  • Fennel Seeds - 1 teaspoon
  • Coriander Seeds - 1 teaspoon
  • Grated Coconut - 1 tablespoon
  • Red Chilly Powder - 3/4 teaspoon
  • Turmeric Powder - 1/4 teaspoon

Method
          Chop the cauliflower into medium size florets, wash well and then add to boiling water and switch off. Leave it for 5 minutes and remove it.


          Boil some more water and add the soy chunks, switch off and cover and leave it for 30 minutes. Then squeeze out the water and keep the soy chunks, if they look too big slice them into two. Grind all the ingredients given under 'to grind'.


          Heat some oil, add the 1 red chilly and curry leaves, mix for a few seconds, then add the cauliflower and the soy chunks and mix.


          Now add the ground paste and salt, mix well, add a little oil and keep cooking on medium heat, till the cauliflower looks roasted and gets light brown spots. Serve it warm.


Note
The cauliflower that we get in India is best done like this, but for the cauliflower that's available in the US, don't leave it for 5 mins in the hot water, just wash it with hot water, otherwise it'll turn very soft.
While cooking the cauliflower after adding the paste, keep mixing the vegetable and soy chunks at intervals.
reade more... Résuméabuiyad

National Blogging Day Of Remembrance

           My heart bleeds for those affected, the victims of the Connecticut shooting, let their souls rest in peace...

National Blogging Day of Remembrance
reade more... Résuméabuiyad

Chocolate Sandesh


          Today is a special day at Aromatic Cooking, it was this day one year back.., yeah you guessed it right, it's the 1st Blog Anniversary. I can't believe it's been so long, it was an unplanned beginning, but an enjoyable journey. At this point, I can't thank enough my blogger friends for their encouraging comments and not forget to mention their wonderful blogs from where I get the inspiration to keep going. I should also thank my family, especially my husband and daughter for putting up with my delicious (sometimes disastrous) experiments. I know I have to work still harder to make the blog even more appealing but I'll be also equally enjoying doing it. So today, to celebrate this big day, I have made some Chocolate Sandesh. It turned out really good, my daughter who's not a big fan of Indian sweets, liked this because I had made it a chocolate one. If you like milk sweets and like chocolate, then do give this a try..

Need To Have

  • Milk - 1 litre or 4 cups
  • Curd - 8 to 10 tablespoons
  • Caster Sugar - 8 tablespoons
  • Cocoa Powder - 2 teaspoons

Method


          Bring the milk to a boil, start adding the curd, when the milk starts curdling, stop adding and switch off. Now strain the milk solids in a cotton cloth (not too thick or thin). Bring the ends of the cloth together to form like a sac, squeeze out as much liquid you can. Then hang it from a faucet or door knob for about 1/2 an hour.


          Remove the milk solids (paneer/Indian cottage cheese) from the cloth, I had a little more than a cup, take 1 cup and knead it well for 5 minutes. Now add the sugar and the cocoa powder.


          Knead  it for another 3 minutes, till everything is mixed in well. Now take this in a pan and put it back on the stove and keep mixing on medium heat for not more than 5 minutes. Remove and when you can bear the heat, shape them into balls and slightly flatten them. Serve it chilled, though we liked it even at room temperature. I have decorated them with some chocolate shavings.


Note
Do not cook the mixture for more than 5 minutes, lesser is better. If you leave it longer it turns crumbly and you can't shape them into balls, but of course still edible, I got it right only on my third attempt, the first 2 times I ended up with a scrambled mixture.
I have given as 8 to 10 tablespoons of curd, depending on the sourness, you'll need more or less, don't add everything at once, add little by little.
Also you can you use lemon juice to curdle, for 4 cups of milk you'll need about 4 tablespoons of lemon juice. If you are using lemon juice, then before hanging the paneer, wash it well with the cloth, by dipping the sac in a bowl of water, squeeze the water and then hang it. This will remove the lemon flavor.
I got 10 pieces with the 1 cup of paneer that I used.
Use powdered sugar if you don't have caster sugar.
reade more... Résuméabuiyad

Lemon Rice


          Lemon Rice is one among the typical mixed rices of South India, a simple yet very tasty one. This along with potato fry is an awesome combination. But during my college days when I was in the hostel, I used to simply hate this rice, I never knew that lemon rice could be made so bad until then, the rice had a dark yellow color from an overdose of turmeric powder and didn't have a hint of the lemon flavor. The perfect lemon rice should have the light yellow color and you should be able to taste the slight sourness from the lemon juice added to it, also I add some chopped ginger which compliments the lemon..

Need To Have

  • Rice - 3/4 cup
  • Lemon Juice - 2 tablespoons
  • Raw Peanuts - 3 tablespoons
  • Broken Cashews - 1 tablespoons
  • Split Moong Dal - 1 tablespoon
  • Chopped Ginger - 1 tablespoon
  • Green Chillies - 2 slit
  • Dried Red Chilly - 1
  • Mustard Seeds - 1/2 teaspoon
  • Urad Dal/Black Gram - 1 teaspoon
  • Asafoetida - 1/4 teaspoon
  • Turmeric Powder - 1/4 teaspoon
  • Curry Leaves - 15
  • Salt - to taste

Method
          Cook the rice with some salt and a teaspoon of oil, when done, cool and keep it. Soak the moong dal for 1/2 an hour.


          Heat some oil, first add the peanuts, roast till it starts getting the roasted color, now add the cashews, followed by the urad dal and mustard seeds.


          When the mustard seeds start spluttering, add the green chillies and red chilly, ginger pieces and the soaked moong dal. Saute for 2 minutes, then add the curry leaves, asafoetida and turmeric powders, mix, then finally add the lemon juice and salt and switch off.


          Cool slightly and add to the rice and mix well.


Note
I used parboiled rice, can also use raw rice, somehow I don't prefer basmati rice which has a flavor of its own which dominates over the lemon flavor.
Whichever rice you use, when cooked, the grains should be separate.
Always mix the lemon juice mixture little by little to the rice, sometimes the lemon could be a little too sour, also if you feel the sourness is not enough, you can always squeeze some lemon juice at the end.
Have the rice at least 1/2 an hour after it's mixed, this allows time for the flavors to sink in.
reade more... Résuméabuiyad

Capsicum Saute/Stir Fry


          You have less time in hands or you are feeling bored to do something elaborate, but still want to have something tasty ( this is always me in the house) and of course you have a few capsicums in hand and most important, you like them, then this Capsicum Saute is for you. The preparation time is very less, just slicing the capsicums, and the cooking time is less than 15 minutes. A nice curry which can be had with rotis or mixed with rice or even stuffed in some bread, tastes good whichever way you choose..

Need To Have

  • Capsicum/Green Bell Pepper - 4 medium sliced
  • Red Chilly Powder - 1/2 teaspoon
  • Coriander Powder - 1 teaspoon
  • Turmeric Powder - 1/4 teaspoon
  • Asafoetida - 1/4 teaspoon
  • Garam Masala - 1/4 teaspoon
  • Mustard Seeds - 1/2 teaspoon
  • Salt - to taste

Method


          Heat some oil, add the mustard seeds, when it starts spluttering add the capsicum slices, cover and cook for 3 mins.


          Remove the lid, and add the asafoetida, salt, turmeric, chilly, coriander and garam masala powders. Mix, reduce the heat and keep sauteing for about 5 minutes, till the capsicum pieces look a little wilted. Remove and serve it warm with rice or rotis.


Note 
You can do this with a mixture of different colored capsicums.
In this curry the capsicum should not be crunchy, they should be soft.
reade more... Résuméabuiyad

Keerai Paneer Parathas/Spinach Cottage Cheese Flatbreads


          I had got this bunch of arai keerai, a type of greens like spinach and mustard greens. I had wanted to do the Keerai Masial and rice, but my daughter didn't want to have rice that day. I had to use the spinach the same day and I had some paneer in the freezer, so put the the two together and made these Keerai/Spinach Paneer Parathas. They came out very well, we had it with some tomato thokku and curd..

Need To Have
For The Filling

  • Chopped Keerai/Spinach - 3 cups
  • Paneer - 1/2 cup scrambled
  • Red Chilly Powder - 1/2 teaspoon
  • Turmeric Powder - 1/4 teaspoon
  • Cumin Seeds - 1 teaspoon
  • Salt - to taste

For The Outer Layer

  • Whole Wheat Flour - 1 + 1/2 cups
  • Ajwain - 1 + 1/2 teaspoon
  • Turmeric Powder - 1/4 teaspoon
  • Salt - 1/4 teaspoon

Method
          Mix the flour, ajwain, salt and turmeric powder, add water little by little and make a soft dough, cover and leave it. Coarsely pound the cumin seeds.


          Heat some oil, add the cumin seeds, when it starts sizzling, add the turmeric and chilly powders, immediately followed by the spinach and salt, cover and cook for about 5 or 7 minutes till the spinach gets cooked. It should be dry, if there is water, cook it uncovered till it dries out.


          Now mix in the paneer for about a minute, remove and cool. Make ten balls out of the dough and the inner filling.


          Roll out a small circle, place one filling  and press it slightly. then close the dough over it and make a flat ball with it.


          Now, dusting with some flour roll out into discs, put it on a hot tawa or skillet, cook on both sides with some oil. Serve it warm with any pickle.


Note
While rolling out after stuffing with the filling, roll it on the side that you close, it's easier and the filling doesn't come out that much.
Only flip the parathas three times while cooking, first you place the paratha, after half a minute, make the first flip, apply some oil, make the second flip and apply oil on the other side. Once the bottom side gets some brown spots, flip the third time and cook the other side.
If you don't have ajwain/bishop weed just ignore it.
You can use any kind of greens, just make sure the filling comes out dry.
reade more... Résuméabuiyad