Pages

.

Showing posts with label Andhra cuisine. Show all posts

Sprouted Moong and Barley Pesarattu


P1020937
Hi Friends!
As it’s said “Eat breakfast like a king, lunch like a prince, and dinner like a pauper”. Breakfast is the most important meal of the day and I look forward to make easy, filling and healthier options for the same. Body needs a good dose of balanced diet in the morning after staying without food for about 8-10 hours. I surely try to concoct various pancakes or crepes as they are filling, nutritious and less time consuming.
Pesarattu is a crepe quite similar to dosa made from green gram without using the rice, it is quite a popular dish from Andhra Pradesh. It is either made with the husked or dehusked lentil and based on the type of lentil used it has a green or yellow colour.
This time when I made this I modified it to a large extent, instead of using the lentils I used the whole green gram (sabut moong) and  sprouted them to make it a more nutritive option, to increase the protein content added split black gram flour (urad dal), to further it added the whole barley flour and to keep it crisp used rice flour too.
Sprouting the legumes increases the protein content which is very important for the growth and development of cells. Barley is a very good diuretic and aids in healthy functioning of the kidneys. So this pesarattu is full of health benefits.
Ingredients
about 4 cups of sprouted green gram
1 cup rice flour
1/2 cup barley flour
1/2 cup urad dal flour
5-6 green chilies
a handful of cilantro
1 tsp chili pwd
2 tsp cumin pwd
3 tsp coriander pwd
a tsp of cumin seeds
salt to taste
water to make the batter
P1020936
Method
Make a coarse paste with sprouted moong, cumin, cilantro, ginger and green chilies.
Mix all the flours.
Add salt to taste, cumin pwd, red chili pwd, coriander pwd and add water to make a dosa like batter.
Smear some oil on a non stick pan and spread the batter in concentric circles. This is thicker than the normal dosa.
Cook it from one side till you get a golden hue and then flip and cook on the other side.
Serve it with roasted peanut and coriander chutney.
P1020939
reade more... Résuméabuiyad

Raw Jackfruit & Red Lobia Salan

P1020827

Hi Friends!
It’s summer time and Jackfruits are in season and are available abundantly now. I have already mentioned the health benefits of this fruit in my post Raw Jackfruit Curry earlier.
Today while I was watching a cookery show, I saw a curry made using the jackfruit and lobia (black eyed peas) and I loved the combination. She had made it using coconut and many spices but I decided on making a low spice and low calorie curry.
I have a Muslim friend S who once mentioned to me that she does not use any tomatoes or curds in their Salan (Curry) and their gravy only comprises of onion-ginger-garlic and the only spices that she puts is turmeric, red chili and coriander powder. She explained that the entire stress is on how well the masala is roasted(bhuno) and to that I completely agree. A connoisseur of food can surely make out the difference between a well roasted  and a poorly  roasted masala so I was all set to try her method and was curious to know how would a curry taste without any tanginess.
I’m glad I made this curry because my apprehension of not using any sour flavour in the curry has now vanished from my head. The combination tastes good and the curry was extremely tasty. Personally I loved eating it with rice. I had used very less oil to make this curry and had sauted the masala ingredients prior to grinding them, so in this way I needed very less oil to roast the masala later.
Ingredients
3 cups raw jackfruit cut into pieces
a large handful of red lobia soaked in water
3 large onions
8-10 garlic pods
an inch piece of ginger
a tsp of cumin seeds
3 tbsp coriander pwd
1/2 tsp turmeric
2 tsp red chili pwd
2 whole kashmiri red chilies
oil about 3-4 tsp
Method
Pressure cook the lobia and jackfruit.
P1020807
Meanwhile in a non stick pan saute the onions, ginger and garlic along with some cumin seeds, red chilies and coriander powder.
P1020812
P1020813


Cool this and grind it together.
P1020814
Heat a non stick pan and take about 2 tsp of oil and roast the masala on low flame till a nice aroma generates.
P1020815
Add salt, turmeric and red chili pwd and roast for a few more minutes.
P1020816
Now add the cooked lobia and jackfruit and mix thoroughly.
  P1020817    P1020818
Gradually add water to get gravy like consistency.
P1020819
P1020821
Simmer and cook on low flame till all the ingredients imbibe the flavours.
P1020829
This curry proves completely that low oil curries can be very tasty, it’s time that I indulge more into it.
reade more... Résuméabuiyad

Indian Cooking Challenge- Chegodelu/Chekodelu

clip_image002
For this month’s ICC challenge we were asked to make a savory from Andhrapradesh ‘THE CHEGODELU’. I wanted to make this in the beginning of the month, but I was advised to stay away from frying and fumes because of severe congestion in the chest which ultimately got diagnosed as Pneumonia. Gladly I could just squeeze in today, the last day of ICC when I am supposed to post, to make these cuties.
We were given two recipes, I used the first one.I had read the recipe when it was announced and did not find it too complicated to try.. as now I have a better hand in making the ‘Ukad’ with rice flour i.e to make a dough by steam cooking method. The chegodelu’s are  a little time consuming but worth all the effort. They are nicely crispy and tasty too. As a type this post I have already laid my hand on these and finished a few, I hope I can keep a few for everyone to try…
Recipe by Srivalli
Ingredients Needed:
Rice Flour - 1 cup
Water - 1 cup
Split Yellow Moong dal - 2 tblsp
Cumin Seeds - 1 tsp
Sesame Seeds - 1 tsp
Chili powder - 1 tsp
Ghee or oil - 1 tblsp, Salt to taste
Oil for deep frying

Method to prepare the Chegodelu
Making the dough
Soak moong dal in water for half hour to 1 hour.


In a deep bottom pan, boil water, then add salt, ghee and moong dal. Bring it to boil, simmer and slowly add the rice flour. Using a rolling pin or the ladle, mix the flour with water by stirring it well. When the flour is mixed and done, turn off the heat immediately. Cover with lid and keep aside for 10 to 15 mins. It’s always better to have a little less water while making the dough than having excess water.

P1010666
Once the dough is cool, add chili powder, sesame seeds, cumin seeds and mix well. Knead till you get a smooth dough. Adjust the salt and spice depending on your preference. I needed to add a little water to make a smooth dough. The best way is to take small portions and knead them well, if required use water.
P1010669
Grease your fingers and pinch out a  small ball (size of a large marble) and roll it on flat, clean  surface to  a rope of about 2-1/2 – 3 inches length.
P1010665
Bring the two ends to together and press to form a rope. Ensure the ends are firmly pressed as not to give out during frying. Continue with the rest of the dough until you are done with the entire batch. You can either cover it with a plate or a cloth to prevent the dough from getting dried.
Frying the Chekodelu
Heat a pan with oil, enough to fry 7-8 at a time (I have tried to save my time).  The temperature should not be smoking hot.Check if the oil is in the correct temperature, by dropping a tiny bit into the oil. Then gently slide the rings or the chekodelus  in batches of 7-8. The flame has to be on high until the chekodelus come up to the surface, then lower the flame to medium and cook till you get a golden colour on the chekodelus.
P1010670
When the chekodelus are golden all over, using a slotted ladle, remove to a kitchen towel and cool. Store in an air tight container for longer shelf life.
clip_image002[6]
Notes: Remember to turn the heat to medium to high and high to medium for getting the chekodelus to golden colour and also to be cooked evenly. Only this way you get crispy chekodelus. These should not be cooked on low flame as they will absorb more oil and can turn soggy also at times.
Variation:   Instead of Cumin and Sesame seeds, 1 tsp of Ajwain or Omam can be used along with chili powder.
I added a little asafetida to mine.
reade more... Résuméabuiyad

Andhra Special- Gongura Pachadi

clip_image002[4]
Gongura in Andhra or Ambatchuka, Ambadi in Maharashtra, Pulichakeerai in Tamilnadu or Surrel leaves in English, are sour leaves. The hotter the region the sour the leaves. The best leaves are available in Andhra Pradesh.
clip_image002[1]
The leaves are a rich source of Iron, Folic acid, Vitamins and antioxidants essential for our nutrition. It is highly recommended for patients with heart and sugar problems. Gongura comes in two varieties, green stemmed leaf and red stemmed. The red stemmed variety is more sour than the green stemmed variety.
I used to make this Pachadi in various variations during our stay in South India. After moving here I have tried searching for it but people were not aware. During my recent visit to Bangalore my eyes were searching for them and I found them with a small vendor. I got hold of the red variety and very greedily I bought 4 bunches of it Wink (it reduces considerably in volume on cooking) and used it the very next day after arriving back so that they do not get spoilt. The leaves were not very sour to my expectation so I added an extra dash of tamarind paste. One can adjust the same as per their taste.
clip_image002
This Pachadi is very common in Andhra homes, especially in rural Andhra. It is a blend of hot and sour flavors and tastes best with hot rice along with raw oil / ghee. I like it with hot paratha.Thumbs-up
Ingredients
3 cups gongura /Surrel leaves
3 garlic pods
2 tsp tamarind paste
15 bedagi red chilies
1 tsp fenugreek seeds
3 tsp coriander seeds
1 string of curry leaves
2 tsp each bengal gram and split black gram ( chana, urad dal)
1/2 tsp cumin seeds
gingelly oil 7-8 tbsp
mustard seeds
1 tsp asafetida
Salt to taste
Method
clip_image002[3]
Heat a spoon of oil and put both the dals followed by fenugreek seeds, let them turn to a golden colour. Add cumin seeds, coriander seeds and roast it for a minute. Add the red chilies and roast for 2-3 minutes. Let the entire thing cool down.
clip_image002[5]
Heat another spoon of oil and add garlic pods and let them turn light golden in color. Now add the leaves and salt and cook for a minute. Cool and add curry leaves, the dal mix and tamarind paste and grind. If required add a little water.
Heat the remaining oil and add the mustard seeds. After they splutter add heeng( asafetida). Pour it over the pachadi and mix.
Serve with hot rice.
clip_image002[6]
Tip- The Pachadi needs extra oil else it tastes dry with the rice. If required, raw filtered oil (gingelly, peanut) can be served on the rice. My family likes it that way.
reade more... Résuméabuiyad

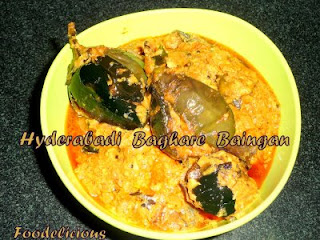
Hyderabadi Baghare Baingan, Stuffed Eggplant Version -I


Ever since I have started blogging my experiments in the kitchen are increasing day by day. I have started experimenting with the various Indian cuisines. Our country India has a vast treasure of various cuisines and I have just started my culinary journey to explore that. I have started it by experimenting with the tried, tested and the famous dishes.


One thing that I am doing regularly these days is dig into my diaries, in which I have been noting down countless recipes over the years, and I am using them in a real sense today. One such recipe which made me stop and experiment with is Hyderabadi Baghare Baingan.


I have always had Telgu neighbours since my childhood. Infact one of my such neighbours was Kumari aunty. She was an affectionate lady and both her children used to love me a lot. I used to be invariably at her place, so my lunch & dinner a lot of times used to be with them. Once it so happened, aunty was sending her kids off to school and I was feeling very hungry. She was not able to pay attention towards me, so the frustrated me went into her kitchen and opened one of her chutney jars and put my hand into it and started eating (I was just 3 yrs old). This was the famous ginger chutney into which I had laid my hand. I was crying and eating as I found it too spicy(poor mischievous me), fortunately aunty realised that I was in the kitchen and when she saw me, she rushed to call my mom. The gist of this entire story is that I realised at the age of 3 that hyderabadi food is SPICY.


The hyderabadi cuisine is slightly sour, spicy and richly endowed with the nuts and assorted spices cooked in ghee - has to be enjoyed to be believed. Sometimes slow cooking and Dum help produce rich flavors.

So here is how I made the Baghare Baingan.


What I Used


2 tbsp ghee
oil for frying
500 gms small Brinjals/Baingan/Eggplant
2 onions finely chopped
1 tomato finely chopped
1 small piece ginger
3-4 garlic pods
1 tbsp cashewnuts
1 tbsp coriander seeds
1 tbsp roasted peanuts
1 1/2 tbsp roasted sesame
1 tbsp roasted dry coconut
2 tbsp fresh coconut
2-3 tsp poppy seeds
1 1/2 tsp chili pwd
1/2 tsp turmeric pwd
1 tsp tamarind paste
salt to taste

For tempering

3-4 cloves
2 green cardamoms
1/2 inch piece of cinnamon
few curry leaves
1 tbsp ghee

How I made it

  • Make criss-cross slits in the baingan keeping the stem intact.
  • Deep fry the baingan.
  • Grind together poppy, sesame, coriander seeds, both the coconut, peanuts and cashewnuts to a paste using minimum water.
  • Heat ghee and add the chopped onions and saute them till light brown in colour.
  • Add the tomatoes, salt, red chili and turmeric powder.
  • Crush the ginger-garlic and add to the onion-tomatoes.
  • Saute till the raw smell of garlic disappears.
  • Now add the paste then the brinjals. Mix properly, add tamarind paste and a little water to get a good consistency. Bring it to a boil, cover and cook on low flame for 5-6 mins.
  • Heat a small pan and add a tbsp of ghee. Add all the tempering ingredients and pour it over the Baghare Baingan. Mix properly. Cook more for 2-3 mins.
  • Serve it with hot rice or roti/paratha.
This is my entry to FIL- Brinjal hosted by Sanghi.


This preparation is dedicated to my elder son . He relishes any preparation of stuffed Baingan I make.

Note-
This particular dish when I cooked , I did not make it too spicy as we eat medium spicy food. When S had it, his comment was 'Excellent taste but I think your story in the post is spicier than the preparation'. So those who love to eat very spicy food, add 10 more red chilies to your preparation.
reade more... Résuméabuiyad