Pages

.

Showing posts with label Rice Preparation/Pilaf. Show all posts

Chana Dal Pilaf/ Khichadi; Winner Of Only Cooking From Royal Kitchen


DSC_2177-001


Hi All!
There are always days when you are not in a mood to cook an elaborate meal and what one is looking forward, is to have a one pot meal which is healthy and filling. I was also in such a mood today. For an unknown reason my right leg muscle has got pulled and I am not able to walk properly, so wanted to cook something very quick without straining the leg. S, was also going to come home for lunch as he has to travel on work for a few days, so I had to cook, there was no option of escaping..

I postponed cooking as much as possible and then finally I pushed myself into the kitchen a little before the noon. I was still undecided. S, had told me that he would eat khichadi but I was in no mood to eat the regular moong dal khichadi. I wanted to eat something different and yet simple…
I rummaged through my containers to see if anything excited me.. in this process I spent another 15mins and my leg started talking to me. I had to think fast and cook quickly too..Finally I landed myself on the chana dal (Bengal Gram) and decided to make a rice preparation with it which could be called a khichadi or a pilaf. I guess I had read this recipe somewhere while surfing cookbooks at landmark and the recipe got imprinted in my brain for it’s simplicity. I do not remember whether the preparation was a pilaf or khichadi but for me the thought of cooking Pilaf satisfied me..I was not going to have khichadi. What  I was cooking  was a kind of  khichadi made pilaf style..basically I was cooking with rice and lentils but the taste and texture had to be of the pilaf.
I did not add any turmeric to my preparation as I wanted the yellow grains of the Bengal Gram to shine through the white grains of the rice. I also added very less spices and concentrated more on the aroma and flavors. I wanted it to have subtle taste which would just play lightly on my palate and to my delight I achieved it too..the khichadi/pilaf was an unusual combination for me with light flavors and a beautiful aroma, I loved the preparation to the core and so did S..I know, I’ve run into one jackpot recipe which is also a one pot meal ..it’s a simple preparation which most of the people would like to eat and cook!!StarRed heart
I served it with a quickly made, tomato cucumber raita and jackfruit pickle.

Chana Dal Pilaf/ Khichadi

DSC_2181

      Serves:3

   Soaking Time: 1hour

Preparation Time: 10mins

     Cooking Time: 15mins


Ingredients

1cup Bengal gram (soak for an hour)
1cup rice (soak for half an hour), I used small grain rice
5-6pepper corns (add more if you like spicy)
2-3cloves
a small pinch of asafetida mixed with water
about 4 to 5cups of water ( as per your rice quality)
salt to taste
For Tempering
1-2bay leaves
2tbsp oil
2tbsp ghee/ clarified butter
one onion sliced
1/2tsp cumin

DSC_2182-002

Method

Soak the rice and dal for the mentioned time. Do not add excess water for soaking, it should just enough to dip the lentil and rice.
In a pan heat oil and ghee (one can use only ghee or only oil, choice is yours).
P1080434
Add the cumin and let it splutter.
P1080435
Add the bay leaf.
P1080436
Tip in the onions.
P1080437
Crush the pepper and cloves together and add to the onions, mix.
P1080438
Add salt to taste, mix.
P1080441
Once the onions are cooked, add the rice and lentil and saute for a few minutes. Also add the asafetida mixed in water.
P1080443P1080444
Add boiling water the rice-lentil mix. Cook covered till done. (Give quick stirs while cooking). Ensure, that you have not added excess water unless you prefer your rice mushy..
P1080449P1080451P1080452
Serve hot with raita and pickle. If you, like you can also add a little ghee on the top of the pilaf.
DSC_2168-001


Coming to the winner of ‘Only’ Cooking from the Royal Kitchens, out of the 58 Indian entries sent to Divya, I’ve picked the winner. I’ve followed my principle of picking a winner who is also a follower of my blog Publically and not picked from those who do not follow my blog publically.
The random number that I got who is also a follower of my space is no.26, which was a post on Khajur pak posted by Sanoli Ghosh. Congrats Sanoli, you will receive a book on Punjabi Subzis from www.tarladalal.com, who are the sponsors of the event giveaway. Please mail me your address with a landmark, pin code and also your landline/cell number to cookingoodfood@gmail.com within two days. In case Sanoli is not able to claim her win, I’ll pick another winner after two days.
I hope you enjoy reading my posts, your feedback is always awaited!!! Will meet you all in my next post, till then see you..
reade more... Résuméabuiyad

Raw Green Chickpeas Biryani

013

Hi.

Winter is the season of greens and with that you can also see the fresh green chickpeas abundantly available. As a child and even today I love opening it from it’s pod and eating them raw as well as roasting them too. I also enjoy eating the saag made with it’s leaves which I will try to post sometime.

As a child, I remember carrying a small bunch in my hand and then eating it sitting on a dari in the courtyard while I drenched myself in some sunlight.


Now a days the peeled fresh green chickpeas are available easily in the super marts, surely making our lives easier in the times of hurry. I had a pack of this with me which I wanted to use in an innovative and tasty way, so I thought of making a biryani. The end result I must say tasted really good and with a combination of mixed veg raita is an excellent one pot meal. I had skipped my breakfast so after I finished clicking the pics I savoured myself with a plate of biryani and a bowl of raita and simply relished my wholesome mealOpen-mouthed smile. The green chickpeas had imbibed all the flavours properly and the rice was rightly aromatic just giving the perfect kick to the taste buds.

Ingredients for Green Chickpeas Curry

2-3 bay leaves

200 gms fresh green chickpeas

3 onions finely chopped

2 tomatoes finely chopped

3-4 tbsp. yogurt

3 large garlic pods

an inch of ginger

1-1/2 tsp. red chilli pwd

2 tbsp. coriander pwd.

1/2 tsp. turmeric

salt to taste

1 tsp garam masala

mix of ghee and oil for cooking

For rice

2 cups long grain/ basmati rice

4 bay leaves

1, 2” cinnamon stick

4 green cardamom

2 black cardamom

1 javitri

salt to taste

1 tsp oil

1 tsp lemon juice

For garnish

fried onion strips

mint leaves

a pinch of saffron soaked in half cup milk

about 4-5 tsp ghee

Method

For making the Rice

The biryani rice is quite aromatic and the aroma comes by adding whole spices while cooking the rice.

Soak about 2 cups of basmati rice in water.

Boil about 7 cups of water, to this add oil, lemon juice, whole spices and then add the soaked rice into it and cook till almost done (the rice grains must have a bite). Cooking in excess water allows the grain to be separate, drain the rice and pour some cold water on it to stop it’s cooking.

FOOD21

To Make The Green Chickpeas Curry

While making the curry for the biryani one must make it more  spicy than the normal as it has to provide flavour to the rice too.

Heat a mix of oil and ghee and add the bay leaves followed by ginger garlic paste and saute. Now add the chopped onions and saute them till light brown in colour, tip in the tomatoes now and cook till mushy. Add the spices and salt now followed by the garam masala. Lower the flame of the gas and the yogurt stirring continuously so that it does not curdle. At the end the curry should have a semi gravy consistency.

P1050673

Layering the Biryani

Spread a layer of rice followed by the curry, sprinkle some fried onions, about 2 tsp of saffron flavoured milk, few chopped mint leaves and a teaspoon of ghee. Repeat this layering process again with rice and curry till the top of the container. Seal the container and cook in a microwave at 100% power for 7-8 minutes and then let it rest for another 7 minutes before serving.

FOOD2

Serve hot  garnished with fried onions and mint with a  bowl of mixed veg raita.

015

Sending this to MLLA-32nd Edition hosted by Sandhya and is the brainchild of Susan.


reade more... Résuméabuiyad

Sprouted Masoor Pilaf and Restaurant Style Punjabi Dal Fry

P1030420
Hi!
There are days when you do not want to cook elaborately but the taste buds demand for tasty food. An option would be to make a one pot meal, another option can be to order out but this time I did not do either of that, I utilized things in my refrigerator and did cook an wholesome  combination. Today I am writing about a very interesting, extremely tasty and a healthy combo.
A few days back when everyone in the family had left for school and office, I finished my morning chores and sat down quietly on my bed. My thoughts took me back to about 20 yrs back when I was still a school going girl and my Mavshi (maternal aunt) and cousins had come to stay with us at my Mom’s place and all of us had gone to see the dam. While returning back it rained heavily and we had fun in rain and then played antakshari while we drove back home.
After reaching home, everyone was tired and the ladies in the house were surely in no mood to cook elaborately. My aunt initiated to cook and introduced us to this simple pilaf using Masoor while my Mom made the raita and fried some crispies.
I was suddenly extremely excited remembering this Pilaf and wanted to try it immediately. Though my aunt had used masoor directly, I thought of sprouting them to make the preparation more healthy. Along with the pilaf I made S’s all time favorite Punjabi Dal Fry or Dal Tadka. Whenever we go to eat out in North Indian restaurants, DH prefers to order this and the last few times the dal was not up to his taste, so I decided to pamper his taste buds.
The dal turned out extremely tasty and everyone was asking for more of it. S’s compliment was the best …he said, this beats any of these Punjabi restaurant preparation!!! So, if you are in a mood to try restaurant style, err sorry better than that dal fry, do try this, I will vouch for the taste! Pilaf is very light to eat and has no heavy flavors. We just loved it for it’s simplicity.

P1030394                                              Sprouted Masoor

Ingredients for  Sprouted Masoor Pilaf
2-1/2 katori basmati rice
4 handfuls of Masoor sprouts
3 medium onions sliced
3-4 green chilies
a tsp shahjeera
mixed spices-
3-4 bay leaves
5-6 cloves
2 inch pieces cinnamon
4-5 green cardamom
3-4 black cardamom
salt to taste
oil for cooking

P1030423
Method to make Pilaf
1. Heat oil in the pan and add the shahjeera, once it crackles, tip in the  mixed spices and let them crackle.
2. Add the green chilies, followed by sliced onions ( I used 2 onions here, 1 onion was fried to garnish later).
3. Add the sprouts and mix properly. Also add in the salt as per taste.
4. Wash and  soak the rice for 15 mins. Drain the water in a separate utensil and add this rice to the sauted onions and mix lightly for about 2-3 mins.
5. Add the drained water and more water for cooking ( 2 parts water is taken for 1 part rice). Once the water comes to a boil, simmer the flame, cover the pan  partially with a lid so that the steam can escape and the froth will not rise up.
6. Check it once or twice in between, ensure that the grains are not broken while stirring. Cook till done.
food6-6 
Finally  remove the pilaf  in a serving bowl and garnish with fried onions and serve.
P1030424
Ingredients for Punjabi Dal Fry/ Dal tadka
2 small handfuls chana dal/ Bengal gram dal
3 small handfuls Tuvar dal/ split pigeon pea
5-6 garlic pods
an inch piece of ginger
1 tsp cumin
a mix of oil and clarified butter for cooking
1-1/2 tbsp coriander pwd
1/2 tsp cumin pwd
1/2 tsp turmeric
1 tbsp red chili pwd (adjust as per your taste)
1 tbsp kasoori methi
2 chopped onions
3 medium tomatoes chopped
salt to taste
P1030441
Method
1. Heat oil and ghee mix and add the cumin. Once the cumin crackles, add crushed ginger garlic followed by kasoori methi.
2. Add chopped onion and saute till they are brown in colour (do not burn).
3. Tip in the chopped tomatoes and add the salt. Cook till they are mushy, now add the turmeric,  red chili, coriander and cumin pwd, saute for a min.
4. Wash  and  soak the two lentils together for half an hour and then pressure cook it along with some turmeric and few drops of oil. When the  pressure drops,  add this dal to the onion-tomato mix.
5. Mix the dal properly with the mix and add a little water (about a cup) and bring it to a boil.
6. Sprinkle the garam masala and give final stir before serving.
food6-7 
Serve the dal hot with the pilaf (if one wants, can put a spoon of tadka  again on it, I did not do that).
P1030437
Sending the pilaf to Priya’s Let’s Sprout event.
and the dal fry to  Sunita and Priya Mitharwal’s Think spice-Think Fenugreek event.
Tips
The dal should not be overcooked and grains should be visible. One can add a glass of cold water to the cooked dal so that the grains do not become mushy.
The Shahjeera adds an amazing flavour to the pilaf, so do not avoid that.
A dash of lime juice to the dal tastes really good.
reade more... Résuméabuiyad

Maavinkaayi Chitranna (Raw Mango Rice)– Recipe 1, Step Wise|Karnataka Cuisine

 
DSC_3871-001

Hello friends.
As I have mentioned earlier too that with the onset of summer the markets get flooded with Mangoes. We try to use mangoes in all forms whether it’s ripe or raw. I make many recipes using raw mangoes and this is S’s favorite. He had reminded me several times that I had not prepared this and his favorite Maavinkayi chutney which I have posted earlier.
Today I decided to please him so I made this Chitranna, which is a preparation with rice. Now when it comes to regional recipes from Karnataka my ultimate source is my MIL so to re-affirm the recipe I called her up and am glad I did that because she gave me more variations to the basic recipe, I thought mentally ‘Sone pe Suhagaa’. This is the very basic recipe and the  many variations  which I learnt will surely post gradually.
 
 
This particular recipe is extremely close to the basic vaggarne anna or what we call phodnicha bhaat in Marathi or baghara chawal in hindi. If you have grated mangoes and cooked rice this is a quick one to make. I love the simplicity of this recipe as with minimum ingredients an extremely tasty preparation is made. I personally love such recipes, as they are always a winner and perfect to impress others!Wink So here goes the recipe..
 
DSC_3881-001
 
Ingredients
5-6 cups of cooked rice
3-4 grated raw mangoes (small ones)
7-8 green chilies
1/2tsp turmeric
3tbsp mix of urad-chana dal
1/2 cup peanuts
2-3 sprigs curry leaves
if required some chili powder
salt to taste
oil for cooking
mustard seeds
4-5tbsp chopped cilantro
 
DSC_3868-001

Method
The rice should be cooked in advance, cooled and the grains separated using hand.
Heat oil and add the mustard seeds and let them splutter, now add the urad-chana dal mix and peanuts and fry them, once they turn golden, tip in the curry leaves and chopped green chilies.
Add the grated mango, turmeric and salt to taste, mix and saute till cooked soft.

P1020759

Mix this to the cooked rice along with some chopped cilantro. Mix gently without breaking the grains.

P1020760
 
Verdict- The rice is extremely tasty, when I mixed the rice and tasted it to check the salt I could not control myself with one spoon and landed eating more. It is tangy and spicy and tantalizes the taste buds. Too good to resist and extremely simple to make.
The ingredients here are as per our requirements one is free to adjust as per one’s taste buds.
 
 
DSC_3895-001


reade more... Résuméabuiyad

Fenugreek Fried Rice ….Indo-Chinese Version

P1020435
Hi!
I used to experiment a lot with the basic Chinese sauces during my college days, which has reduced considerably now a days. I would use them in making sandwiches, salads and many more things, sadly half of them I do not recollect now. During one of those experiments I made this rice and was genuinely impressed with my culinary skills. At that age getting complimented for a good preparation makes you feel so proud, so I also took no time to reach cloud nine and this became a secret recipe to impress guests and friends…LOL surely this  was a super hit amongst all who tasted it.
Whenever I would make this rice and carry it in my lunch box, I would rarely get to taste it, all my friends would attack my lunch box and finish it off..to top this was my friend A who herself is an excellent cook. Both of us love to talk about food and can spend hours discussing it. She would always ask for this recipe and I would give her a rough idea how I made it. So A, here’s your favorite preparation, I hope you will treasure it as much as I do.
The fenugreek imparts a very subtle aroma to this preparation and does not overpower the taste buds with it’s bitterness. The preparation is light to eat and extremely flavourful. It’s a good way to make children eat the fenugreek. This recipe is my personal recommendation, so do try it once!!
Ingredients
3 cups cooked rice
2 cups Fenugreek leaves (plucked)
2 onions sliced
4  super seasoning cubes
2 tsp white pepper
2-3 tbsp green chili sauce
2 –3 tsp soya sauce
oil for cooking
salt to adjust
Method
Heat oil add onions and saute till transparent.
Add the washed fenugreek leaves and saute, cook till the leaves wilt.
Add the crushed super seasoning powder and white pepper. Mix properly, add soy sauce and green chili sauce. Cook on high flame, add rice and mix. Add salt if required.


food2-5

This rice can be a complete meal in itself. Relish when served hot.
P1020432
reade more... Résuméabuiyad

Corn-Cottage Cheese Risotto and Grilled Broccoli

P1020289
Hello Friends.
Valentine’s day is a special day for people in loveheart and I can see the blogosphere flooded with dessert and chocolate recipes spreading all the sweetness…smile_teeth I also wanted to post something sweet but then decided completely against that.. and here I am posting two very tasty recipes which perfectly complemented each other! The true reason is I did not want to indulge myself in elaborate preparations as I am still recuperating..
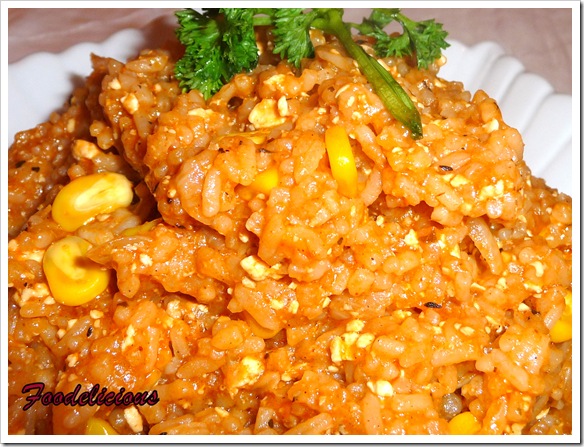
I had made these two preparations for the dinner. S had demanded the Broccoli preparation. A few years back we had had this in a restaurant called Salt n Pepper in Andheri, Mumbai and had simply loved it. Risotto was completely my idea and is truely my version and I am glad I experimented. The last time I had made risotto I did not have the patience to add the stock gradually but this time I did it and the end result…I had that sticky kind perfectly made.I have used the small grain rice that I use at home..one is free to use the Arboreo rice.
Making a good risotto is rather like riding a vehicle for the first time, it takes a little bit of practice to begin with, and a certain amount of attention thereafter. Risotto’s are also very sensitive to timing, and this is why what is served in a restaurant (no matter how good it is) will rarely display that rich texture and just-right doneness that a good home-made risotto will.
The Brocolli I had cooked in grill-micro combination, the taste was nice and it had imbibed all the marinade but I will use 50-50 version the next time to avoid the slightly dry texture which I got this time. I surely like mine extra moist… Sending this combo to the COMBO EVENT  hosted here.
P1020280
Ingredients for  Grilled Broccoli
2 Broccolis separated into flowerets
3/4 cup thick curds
1 tsp cumin pwd
2 tsp coriander pwd
2 tsp chili pwd
1/2 tsp garam masala
1/4 tsp turmeric
2-3 tsp garlic-ginger paste
salt to taste
Chaat masala
Method
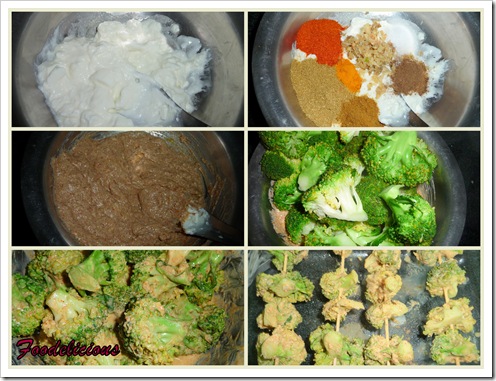
Blanch the Broccoli.
In the thick yogurt mix all the ingredients except the broccoli. and prepare the marinade.
Now mix the broccoli in the marinade and coat it properly with it. Leave aside for an hour and then insert it in the satay sticks, smear it with some butter  and using the grill-microwave function grill for 10-15 mins. Just before serving sprinkle some chaat masala.
food

P1020269 
Ingredients for the Risotto
2 cups small grain rice
1 onion chopped
4-5 baby corns sliced
200g corn kernels
200g tomato puree (I used Kissan tetra pak)
about 150g cottage cheese crumbled
2 tsp each of  dry basil, thyme and Oregano
4 tbsps extra virgin olive oil (EVOO) for cooking
4 garlic pods chopped
2 tsp of Paprika
1 tsp white pepper
about 8-10 cups of vegetable stock
Method
Wash the rice and soak for 10 mins.
In a pan take EVOO and heat it…add onions and chopped garlic. Once the onion turns translucent add the baby corns and corn kernels, saute.
Add the tomato puree, salt, herbs, parika, pepper and mix. Remove the water from the rice and put the rice. Mix it properly with the tomato sauce.
Add a cup of water at a time, once it gets absorbed add the next and so on..till the rice gets cooked and releases the starch. Cooking should be done in an open pan at no point it should be covered.
Once the rice is half cooked add the cottage cheese and continue cooking using more veg stock. At the end add some butter and give a final toss. The entire process of making the risotto can take time anywhere between 20-30mins.
food1

How was the end result? I am writing this post an hour after dinner. Now, after reading this post S is going back to have another round of Risotto.. clap Need I say more…??!!
Wish every one a very happy Valentine’s Day…lets get together and spread the message of love.rose
reade more... Résuméabuiyad