Pages

.

‘ONLY’ Event For October & The Giveaway


Hello all!!
It is just two days now that we asked Lord Ganesha to return again the next year and with the onset of October, we are ready to welcome the Goddess Durga. The next two months are full of festivals, fun and food galore. It is definitely the most awaited period of the year here in the country.

Festival or no festival, a mother’s role for her family never changes. Her day starts with making breakfast and packing lunch box for her family. Her job is never ending.. Moreover, today most mother’s being educated and health conscious invest their time, energy in healthy cooking and that’s what the theme for this month’s event is going to be..
only lunch box
The definition of healthy food can vary from family to family and person to person, so I’m not going to provide the criteria for healthy food but I would insist on a balanced diet, i.e a food that contains protein, fats, carbohydrates, vitamins, minerals, roughage and water.. So don your health cap and come up with healthy and yet interesting ideas for lunch boxes…
For this month’s event the giveaway cookbook sponsored by www.tarladalal.com is
Click on the cover image to sample content from the book

Rules Of The Event

1. Send your entries through the inlinkz tool. There are two inlinkz tools, one for Indian entries / giveaway participants and the second for other countries.
2. Send in vegetarian healthy lunch box ideas (eggs allowed). In case you are not able to use the inlinkz tool, send me a mail at cookingoodfood@gmail.com with following details: post name, blog’s name, recipe url, your name and resized picture.
3. Any number of new entries are accepted but only two entries from the archives accepted. Either repost or link the old post to event announcement and provide it’s URL link in one of your current month’s post.
4. Enter your entry only in one of the inlinkz tools.
5. Link all your entries to this event announcement.
6. The giveaway book is shipped only in India, hence it is open for any blogger who can provide an address in India.
7. To be part of the giveaway enter your entries under ‘Entries for Indian Bloggers and Giveaway participants’.
8. The giveaway is open only for the followers of my blog whom I can see ‘publically’.
9. Usage of logo is optional but I would appreciate if you could use it as it helps spread a word.
10. As much as I want to comment in all your posts, unfortunately with the time constraint these days I’m unable to. But that does not mean that I do not read your posts.  I will definitely leave a comment for those posts where the rules to the event have not been followed. For the remaining posts,  I may or may not leave a comment (depends on how much time I can squeeze out)

If you like the food I cook, please join my face book fan page (check the right column in my blog). Your encouragement keeps me going!!!
reade more... Résuméabuiyad

Eggless Apricot Pistachio Orange Biscotti


         For this month's challenge for the Eggless Baking Group, Gayathri had chosen Apricot Pistachio Orange Biscotti from Baking Obsession. The recipe called for orange blossom water, which I couldn't find in Chennai, so I went ahead with the recipe, replacing the eggs with orange juice which I thought would also make up for the orange blossom water. However, I would like to try this recipe again using the orange blossom water which I hope to get soon on my US trip. Anyways, these biscottis turned out really good, but they were a little too sweet for my taste, I would reduce the sugar by a few tablespoons on my next attempt. Try them out, they are a great teatime or a mid-morning snack..

Need To Have

  • All Purpose Flour Or Maida - 1 + 1/2 cup
  • Granulated Sugar - 1/2 cup
  • Melted Butter - 4 tablespoons
  • Chopped Apricots - 1/2 cup
  • Chopped Pistachios - 1/2 cup
  • Orange Juice - 1/4 cup
  • Baking Powder - 1 teaspoon
  • Vanilla Extract - 1 teaspoon
  • Salt - 1 small pinch


Method
         Sift the all purpose flour and the baking powder. Beat the butter and sugar, to this add the orange juice, salt, vanilla essence, mix well. To this add the flour mixture, mix well (I used my hands, if you have an electric mixer, you can use it). Finally mix in the chopped apricots and pistachios. Form a log and bake it on a greased tray for 25 minutes at 350F. Remove it, cool it, slice it, place the slices on the tray, bake it again for a second time for 15 minutes at 325F. Remove, cool well and store in an airtight container.

Note
The original recipe used 2 cups flour, 2 eggs and 1 cup sugar, I started with 1 cup flour, and used 1/4 cup orange juice instead of 1 egg and 1/2 cup sugar. The dough was too sticky, so I had to add another 1/2 cup flour.
Though I had used unsweetened Apricots and only 1/2 cup sugar for 11/2 cup flour, still I felt the biscottis were little too sweet.
As I am using the microwave oven in the convection mode for baking, the baking time varied a lot, if any of my readers are using the microwave for baking, I would love to get some advice and tips regarding using the oven.
reade more... Résuméabuiyad

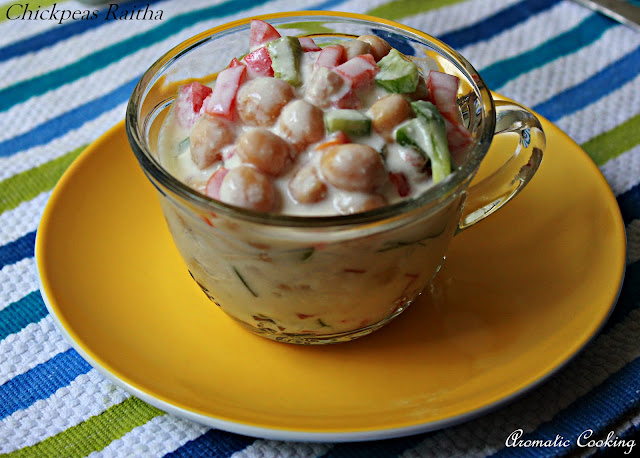
Chickpeas (Chana) Raitha


          I have been a little busy the last few days, couldn't spend much time with my blog, and today's dish is also a very simple one. A simple raitha that would go well with any briyani or mixed rice, or if you are on a diet, this could be a complete meal by itself..

Need To Have

  • Cooked Chickpeas - 1/2 cup
  • Chopped Capsicum - 1/4 cup
  • Chopped Tomatoes - 1/4 cup
  • Curd Or Yogurt - 1/2 cup
  • Salt - to taste


Method
          Beat the curd well, mix in the chickpeas, capsicum, tomatoes and salt, that's it. I have not added any other flavoring ingredients, this raitha gets all its flavor from the crunchy chopped capsicum (green pepper).

Note
You can also add some chopped green chillies if you want it a little spicy.
If you want some other flavor, then add some roasted cumin powder, personally I liked the flavor from the capsicum.
reade more... Résuméabuiyad

Minty Eggplant With Peanuts


          We can find so many different varieties of eggplants in India, different colors and different sizes. And also, this is one of the vegetables that everybody likes at my home, so I make this at least once a week and try out different combinations with it. This is one such, mint and peanuts compliment the eggplants, adds a nice flavor and crunch to the curry, goes well with both rice and rotis..

Need To Have

  • Small Eggplants - 10 sliced
  • Onions - 2 medium chopped
  • Tomatoes - 2 medium chopped
  • Turmeric Powder - 1/4 teaspoon
  • Red Chilly Powder - 1/2 teaspoon
  • Coriander Powder - 1/2 teaspoon
  • Roasted Peanuts - 2 tablespoon
  • Mint Leaves - a handful or 1/4 cup coarsely chopped
  • Mustard Seeds - 1/4 teaspoon
  • Cumin Seeds - 1/4 teaspoon
  • Fenugreek Seeds - 1/4 teaspoon
  • Salt - to taste

Method
          Coarsely pound the roasted peanuts. Heat some oil, add the mustard, cumin seeds, when it starts spluttering add the fenugreek seeds.

       
          When the fenugreek seeds starts turning slightly darker, add the onions and saute till it turns pink. Now add the tomatoes, salt, turmeric, chilly and coriander powders, saute for 3 more minutes. Then add the eggplants, mix, cover and cook till done ( about 5 to 7 minutes).


          Finally add the chopped mint and the peanuts, mix for a minute, remove and serve with rice or rotis.


Note
The cooked eggplants should be soft but hold its shape, if it becomes mushy, the whole curry would be a mess.
Increase or decrease the chilly powder according to your spice level.
Don't let the fenugreek seeds turn dark, it'll give a bitter taste.
reade more... Résuméabuiyad

Quick Pillow Cakes ..In a Sandwich Maker | Tea Time Snacks


DSC_2551

Hi!
I have been eyeing this beautiful cake for sometime now. They had caught my attention instantly and I just wanted to try them at once, as the cakes not only looked beautiful and spongy but appeared very quick to make. With the kid writing his half yearly exams, I’m just too held up these days..and hence wanted to make something very quick and yet interesting,  to cheer him up while studying, I remembered this cake..Thinking smile
I had seen this cake for the first time in Ambreen’s blog and she had tried it from Morning masala. I was instantly glued to the recipe. Such cute looking pillows, yes, that’s what I had thought after looking at the pic and hence I named this cake a ‘pillow cake’. The recipe is so hassle free that a novice in cooking can also try. And what I loved best was no baking tin or oven required..needs a simple sandwich maker.
Since, it was the first time that I tried this recipe, I did not modify it largely, except that I also added some milk. With  all the other ingredients as it is, I went ahead with Ambreen’s measures. Now that I’ve succeeded in making this cake, I’m  ready to experiment..This version is made using egg and now I would love to try eggless.. This makes excellent snack for evening or lunch box.
DSC_2513-001

Preparation Time:15mins

Cooking Time:2-3mins per batch

Makes:16

Serves:4


Ingredients

1cup APF/maida
1tsp baking powder
1tsp vanilla essence
2eggs
1/4cup milk (optional)
1/2 cup oil or  butter
1/2cup sugar
DSC_2486-001

Method

Beat sugar and oil for 3-4mins.
Add essence and the eggs, beat till creamy and light.
DSC_2472
Sieve APF and baking powder together.
Fold in the APF in egg mix.
DSC_2475
Check the consistency of the mix, the batter should not be very thick but slightly easy flowing (consistency of the batter for fritters). Add milk if required and mix.
Grease both the sides of sandwich maker.Using the spoon spread the batter in all the four sections, close the lid.
DSC_2476
Switch on the sandwich maker and bake till the light turns red. Insert the toothpick and check if it comes out clean, else cook for one more minute. I realized that the first batch takes 3mins but after that the cake is ready in 2-1/2mins.
DSC_2477
Serve the cake warm with some cream or butter.
My kid loved it with some butter applied and sugar sprinkled.

DSC_2547
reade more... Résuméabuiyad

Barley-Hyacinth Bean Upma/ Javaa-Avarekaalu Uppittu


DSC_2406-001

Hello again!

I have mentioned several times that my family is a huge fan of avarekaalu/hyacinth beans/field beans/mochai. Come season and I’m ready to peel the tender pods and extract the beautiful seeds, fresh and green. These days we are getting fresh beans and to my delight it has a good flavor too.

Recently on my visit to a gourmet store here, I picked some barley dalia or barley’s coarse meal. I wanted to use it in an innovative way, especially since I was cooking the barley dalia for the first time. I was super excited with the preparation I wanted to try and at the same time apprehensive too. I thought for the first time I was getting a bit ambitious since I did not know how much time it would take to cook but I had used pearl barley in my cooking earlier, so that helped me. .. I realized while cooking, that’s what the foodie in me wanted, some adrenalin rush and then a hopefully a decent foodie treat at the end…

Before I elaborate more about the preparation, I do want to emphasize on the importance and health benefits of this grain. For me, Barley is a powerhouse of nutrition. This centuries-old grain is packed with fiber, contains important vitamins and minerals, is slim on fat, and, like all plant products, cholesterol-free. It is also low on GI (glycemic index) making it useful for diabetics. Since it is an excellent source of dietary fiber, especially the  beta-glucan soluble fiber. Research shows that barley beta-glucan soluble fiber promotes healthy blood sugar by slowing glucose absorption and thus helping the diabetics. Barley is also a good diuretic and helps in cleansing the urinary system. With so many  health benefits it is a grain to be eaten frequently and that’s what I’m going to do now..eat healthy and stay fit!!

Coming back to the recipe.. I did not take a risk and soaked the barley meal  and kept checking the grain every 15mins and realized it soaks faster as compared to pearl barley, the grain had soaked well in an hour. I had the hyacinth beans peeled and stored in the fridge and also had freshly grated coconut. I walked on similar lines of  the Avarekaalu Uppittu that my family loves. Fortunately, the cooking procedure was not at all daunting and the daliya/upma was ready in 20mins. I guess, the soaking helped and it reduced the cooking time too.. I ate a small portion of the upma and realized that the grain is very filling and the upma tasted good with the addition of the beans which also adds nice flavor. I also felt that I should have added more green chilies since the grain by itself is nutty and sticky. A spicy upma would have tasted better for my palate, sadly I’m not able to get hold of spicy green chilies these days… Next time I make this, it will definitely have more chilies!!!

DSC_2450-001

Soaking Time:1hour

Preparation Time:5mins

Cooking Time:20-25mins

Serves:4


Ingredients

3cups of soaked barley dalia/ coarse meal

1cup avarekaalu/ hyacinth/field beans/mochai

6-7 green chilies, finely chopped (use spicy ones)

3tbsp chopped coriander leaves and stem

2tbsp chopped curry leaves/ kadhi patta

1tsp mustard seeds

5-6tbsp refined oil

salt to taste

2tbsp urad-chana dal mix

3-4 cups,boiling water

DSC_2389-001

Method

Wash and soak the barley dalia for an hour.

DSC_2356

Boil the avarekaalu/hyacinth beans with some salt to taste in a pan.

DSC_2359

Heat oil in a heavy bottom non stick pan. Add the mustard, let it splutter.

DSC_2364

Add the urad chana dal mix and fry it light golden.

DSC_2367

Add the green chilies, curry leaves and sauté.

DSC_2368DSC_2369

Add the coriander too and mix. This adds a nice flavor to the upma.

DSC_2370

Tip in the soaked barley meal/dalia. In my case the grains had absorbed all the water. Mix it properly in oil and add salt to taste. Roast it in the oil for 2-3mins.

DSC_2374

Add the cooked avarekaalu and give a good stir.

DSC_2378

Add the coconut and mix.

DSC_2380DSC_2381

Finally, using a measuring cup add 2cups of boiling water (remember avarkaalu also has water).  I felt that 1cup boiling water to 1cup soaked barley was the ratio I followed. Once the mixture boils, put the lid and simmer the flame, cook till done. If required add more boiling water.

DSC_2384DSC_2385DSC_2386

Serve hot.

DSC_2440-001

reade more... Résuméabuiyad

Rajma Masala


          Rajma Masala, this is a long time due post, I have done this dish so many times, couple of times couldn't take pictures and when I took them, the pictures were not that good. A bowl of rice, a cup of rajma (kidney beans curry) and some curd, or like they say it 'rajma chawal' ( chawal meaning rice), I simply love it, a simple and satisfying meal. You can either soak the dry beans and pressure cook them and then do the masala or if you are in a hurry, can use the canned ones and get done with the whole cooking within 10 mins. Everybody has their own way of doing it, this is the way I do it..


Need To Have

  • Red Kidney Beans Or Rajma - 1 cup
  • Onion - 1 big chopped
  • Tomatoes - 2 pureed
  • Grated Ginger - 1 tablespoon
  • Red Chilli Powder - 1 teaspoon
  • Coriander Powder - 1 teaspoon
  • Turmeric Powder - 1/4 teaspoon
  • Garam Masala Powder - 1/2 teaspoon
  • Black Mustard Seeds - 1/2 teaspoon
  • Cumin Seeds - 1/2 teaspoon
  • Asafoetida - 1/4 teaspoon
  • Chopped Coriander Leaves - 1/4 cup
Method
          Soak the kidney beans for at least 10 hours and pressure cook them ( same time as for rice). Heat some oil in a pressure pan, add the mustard and cumin seeds, once they start spluttering add the asafoetida and chopped onions.


          Saute till the onions turn pink, then add the tomato puree, saute for few more minutes.


          Now add the turmeric, chilly and coriander powder, mix add the grated ginger, saute for 2 more minutes.


          Then add the cooked beans and salt, add water, cover the pressure pan and cook it. Once done, open the pan, add the garam masala, mash a little, simmer for 2 minutes, garnish with the coriander. Serve it warm with rice or rotis.


Note
If using the canned beans, need not use the pressure pan, just do it in a regular pan, once you add the beans, add the garam masala, simmer for about 3 or 4 minutes.
Can also use the canned crushed tomatoes ( about 6 tablespoons).
Some beans are too tough, that's when we have to pressure cook twice, first alone, the second time with the tomatoes and masalas, otherwise the beans would stand out separately. 
Also you can soak these beans in hot water or for a longer time, it'll get cooked faster.
Use your judgement, if the cooked beans is soft, then avoid pressure cooking it the second time.
After all the sauteing part is done and the beans are added, you can transfer it to a slow cooker, it turns out to be more flavorful.
reade more... Résuméabuiyad

Kozhukattais - Sweet Version


          As today is Ganesh Chathurthi and I made these kozhukattais, I thought it would be apt to post this today. Kozhukattai is a very traditional sweet, sort of like steamed dumplings, the outer layer is with rice flour and the stuffing varies from sweet to savory. I have used the rice flour that my mother prepares, she uses the same flour for idiyappam and puttu, I think I have to do a separate post on how to make that rice flour. I used a chana dal + coconut + jaggery filling, the kozhukattais came out very soft and yummy..

Need To Have
For The Outer Layer

  • Rice Flour - 1 cup
  • Salt - 1/4 teaspoon
  • Oil - 1 teaspoon

For The Filling

  • Chana Dal - 1/2 cup
  • Grated Coconut - 1/2 cup
  • Jaggery - 1 cup
  • Cardamom - 3

Method


          Boil about 4 cups of water with the salt and oil, adding this little by little, mix the rice flour with a spoon, once you feel you have added enough water to form a dough, remove the spoon, cover and let it cool. Once cold, knead it into a soft dough.


          Pressure cook the chana dal with just enough water ( same time as for cooking rice). Once you open the pressure cooker, mash the chana dal slightly. In a heavy bottom pan, take the chana dal, grated coconut, jaggery and the crushed cardamom, heat it.


          The jaggery starts melting, keep stirring till you get a semi dry filling, let it cool. There are two shapes that we usually do the kozhukattais.


          For the first half-moon shape, you can use a banana leaf or plastic paper, I have used my hand.
Take a lemon size ball, flatten it on your palm or on the leaf or on the plastic paper (apply little oil).


          Place the filling, close it like a half moon and press the edges slightly.


           For the second shape, take a ball slightly smaller than a lemon, shape it with your fingers like a small cup.


          Place the filling, bring it together and close it.


          Arrange in a steamer and steam for 5 to 7 minutes. Remove and serve.


Note
For those living in countries outside India, you can use the rice flour that you get in the Indian grocery stores.
Once the kozhukattais are cooked, they have a shiny look.
You won't be using the entire 4 cups of water for making the outer dough.
If you have excess water in the cooked chana dal, drain it and mash it.
These taste best the same day, you can refrigerate them but then the outer layer becomes hard, doesn't become soft like on the first day, even if you warm them.
reade more... Résuméabuiyad