Pages

.

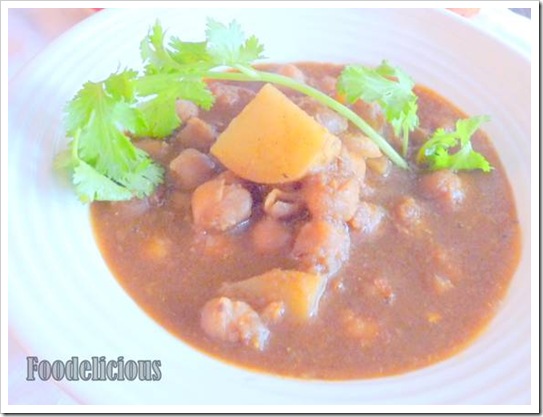
Chana Masala Version II (chickpeas/garbanzo gravy)


clip_image002[6]

Hello.
As I have mentioned  in my first version of Chana Masala, I make this preparation in several ways to break the monotony and obviously to enjoy the health benefits. I am very happy to post the second version, an authentic Punjabi version. This recipe is very close to my heart and I am surely disclosing some secrets of my kitchen here…. Have I aroused your interest now in reading this post?
As we all know any preparation when it is made by two different people using the same ingredients has a different taste. In this recipe some ingredients that I have used are used by everyone but some are surely new.
I personally like my Chana cooked very soft , made in low oil and with a perfect balance of spices. I like it slightly tangy, medium spicy and enjoy eating it with rice. And yes, I surely enjoy the crunch of raw onions with this combo.
It was a while ago that I had cooked the Chana last,  S reminded me that I had not cooked it in ages… so this ever obedient wife soaked the Chana for weekend…I thought suits me fine, I do not have to stand in the kitchen for a long time on a holiday. smile_wink
I let the Chana soak overnight and then started cooking it in the morning. I have used Kachari to tenderise the Chana naturally. I had heard about Kachari in Sanjeev Kapoor’s show and since then I was in hunt of this ingredient. Ideally it is used to tenderise the meat but can be used for Chana too as it takes a lot of time for them to get cooked otherwise. Kachari is a fruit and in dried form is powdered and used.
The other variation which I have done is boiled the Chana with a few ingredients which adds a flavor, deepens the color, increases the nutrient value and aids in digestion of these ‘Sholay’ sorry Chhole…..read the method for that
So lets hit the complete list of ingredients
Ingredients
2-1/2 cups of Kabuli chana (approx 4 handfuls)
2 potatoes cubed (optional)
1 small stick cinnamon
2 Black cardamom
1 tsp tea leaves
9-10 dry amla
1/4 tsp kachari (alternately, you can also use soda bi carb)
for gravy….
3 onions (make a paste)
3 tomatoes (pureed)
7-8 garlic pods
1-1/2 inch piece ginger
oil for cooking
Spices used…
3-4 bay leaves
1 tsp white pepper pwd
2 tsp red chili pwd
1 tsp turmeric
3-4 tsp coriander pwd
2 tsp roasted  and powdered Cumin
1 tsp roasted and powdered Ajwain / Carom Seeds
3-4 tbsp Anardana pwd*
1/4 tsp garam masala (optional) I did not add
Method
Wash the chickpeas and soak it in overnight with 1/4 tsp Kachari powder  and then boil it in the same water ( to retain nutrients) with  this mix  and  also add salt to taste.
P1010947
This mix contains tea leaves which helps to deepen the colour, dry Indian gooseberry (Amla), cinnamon stick and Black cardamom. Tie all ingredients in a cloth (make a potli) and put it  along with the  chickpeas in a pressure cooker, remove the potli after cooking. Amla adds it’s flavor, helps in digestion and is the richest source of Vit C. One can notice the difference in colour after cooking. See below..
clip_image002[8]
Grind the onions. Heat oil and add bay leaves followed by the onion paste and saute till it gets a light brown colour. One can see how the onion changes colour on cooking.
clip_image002[10]
Add crushed ginger garlic paste followed by the tomato puree. Cook till the oil separates and then add all the spices and salt to taste. I must tell my friends that the Anardana (dry pomegranate seeds) used here impart tanginess and it’s taste is very different from Amchoor. It imparts  that perfect tanginess which is subtle and surely add that authentic punjabi flavour, people who have used this will agree to me on this and if you have not used it till now please do not wait, use it!
clip_image002[12]
Add the potatoes, mix, cover and cook till done.
P1010961
Add this to cooked chickpeas and add some water, boil on simmer flame for another 10 minutes.
P1010963
Serve this with Poori / Paratha / Rice / Kulcha / Naan.
clip_image002[2]
Sending this as my entry to EC’s MLLA-19 the brainchild of Susan   
                                             &
SWLEventLogo2.jpg picture by arundhuti
to Arundhuti’s Gourmet affair as this was made with lot of love on S’s demand.
reade more... Résuméabuiyad

Baked Fusilli in Marinara and Healthy-Spinachy Bechamel Sauce

clip_image002[5]
Hi friends.
The word Italian brings in the thought of Pizza, pasta, risotto, wine….and Cheese to my mind. Ritu Dalmia who is a famous Italian Chef and her show Italian Khana is never complete without the description of the famous Italian wines. Now I am surely not a person who has any knowledge and inclination for wine but I surely have an interest for the cuisine so I do watch the show for the food and the humour.
Today I take you to the world of baking with a very tasty and healthy Italian recipe. Italian cuisine has become very popular amongst the young and the old so how can my family be spared. We were planning to enjoy an Italian buffet in a place called Fresco but our plans have got delayed and postponed. I had not baked for a while and the upcoming baker in me was asking me to bake and I surely wanted to cook Italian for my elder one as he is quite fond of Italian cuisine. So one of these days I made this recipe to please everyone and the baker in me.
The journey of cooking this was satisfying as the baked dish surely smelled good. My elder one who kept asking me questions through out his eating…which sauce is this, what have you put in that, which cheese have you put in that? The not so confident me kept answering his questions and then at the end I asked him, why are you asking me so many questions? It’s very nice Mummy, that’s why,  is what I heard. So I was all collar’s up at the end!!!!
Now that I have boasted so much about the recipe and myself let me tell you the ingredients and the method..
Ingredients
2 cups boiled Fusilli (the screw shaped pasta, I used made Durum wheat pasta)
100 gm grated cheese
for Marinara sauce……
1 large onion chopped
3 garlic pods
1/2 inch piece ginger
2 tomatoes chopped
5-6 tbsp tomato puree
1/2 tsp sugar
1/2 tsp oregano
1/2 tsp basil
1/2 tsp freshly crushed pepper
1/2 tsp chili flakes
salt to taste
evoo for cooking
for spinachy- bechamel sauce (white sauce)…
25 leaves of spinach blanched
7-8 spoons of whole wheat flour
about a cup of milk
1/2 cup of water
salt to taste
freshly crushed pepper
4 tbsp home made butter
Method
Boil the Fusilli in 6-7 cups of water with some salt and a few drops of oil.
P1010915
For the Marinara sauce..
First take the onions in the pan and then pour EVOO over it, this avoids overheating of the oil and it losing it’s valuable properties. Saute the onions and add crushed or finely chopped ginger-garlic. Cook till the raw smell disappears.
P1010916
Now add the tomatoes, salt and sugar.
P1010917
Once the tomatoes are cooked add the tomato puree and the herbs. Mix and switch off the flame.
P1010918
 For Spinachy- Bechamel sauce
In a pan take the butter and add the wheat flour. Roast for a minute but do not let the colour change. Mix the water and milk and add this to the wheat flour stirring continuously so that no lumps are formed. This process has to be done fast so I could not take the pics. Unlike the white sauce made with APF this sauce does not thicken a lot on cooling so one must keep that in mind while making the sauce and checking it’s consistency. Season with salt and black pepper.
P1010913
Blanch the spinach leaves.
P1010914
Grind the leaves and add it in the bechamel sauce.
P1010919
P1010920
Now we start the layering.
Grease a baking dish. Spread the first layer ..that’s the marinara sauce.
P1010921
Above the marinara sauce spread the second layer..that’s of fusilli.
P1010922
Now comes the third layer …spinachy white sauce/ spinachy bechamel sauce.
P1010925
Finally the cheese..spread the layer of processed cheese or cheese of your choice.
P1010926
Bake the dish at 200C for about 15 mins or till the top layer melts.
clip_image002[11]

clip_image002[9]
SWLEventLogo2.jpg picture by arundhuti
Sending this healthy and tasty preparation to Arundhuti’s Gourmet affair as this was made and served with loads of love to my family & to CFK-Creative food for picky fussy eaters hosted by Sara’s corner and the brainchild of Sharmi, as I found this a very healthy way of adding spinach and other veggies to their diet.
Cooking for Kids - Healthy Breakfast n Dinner
reade more... Résuméabuiyad

Green Tamarind Thokku – MIL’s Recipe

clip_image002[6]

Hi Friends.

It’s my privilege that I am posting my MIL’s preparation today. When I told her I will post the recipe in your name, she asked me why I would want to do that? My answer was as simple, who ever makes it should get the recognition.

I have mentioned several times earlier that my MIL is an excellent cook. I am extremely fortunate to have learnt many recipes from her and I still keep bugging her for more… When ever I ask her she says very sweetly..TUMKO KO TO SAB AATA HAI, to which I tell her..NO, NO I STILL HAVE TO LEARN A LOT FROM YOU. Then she will say I MAKE EVERYTHING BY APPROX MEASUREMENTS..to which I would reply TELL ME THOSE, THEY ARE PERFECT. Believe me friends this is no exaggeration but our conversation is exactly like this whenever I ask her a recipe. She is a very affectionate lady (though she will always portray her stern side) and am glad to have her as my MIL.

The thokku is extremely simple to make (I realised that when she explained me the procedure) but it’s very very tasty. I have not been able to stop eating this ever since I have received it. Yes, do not turn green, I got a pack full of this amazing stuff!!! It’s spicy, tangy and absolutely yummmm. Do I really need to ask for anything else to pamper my taste buds….. another packet of this is perfectly okay with me, MIL.Open-mouthed 

Ingredients

1/2 kg raw green tamarind/ kacchi imli

salt

400 gm green chilies

1-1/2 tsp fenugreek seeds

3-4 whole turmeric/ 4 tsp turmeric pwd (halkunda)

filtered groundnut oil

mustard seeds

Method

  • Cut  tamarind into 1” pieces and remove the threads / de-string them.
  • Mash the tamarind with a stone, rub some salt and keep aside (this helps tamarind release it’s own water).
  • Leave it overnight like this. Next day with the help of hands remove the seeds.
  • Roast the fenugreek seeds in a pan without oil.
  • In a grinder take the deseeded and mashed tamarind, green chilies, turmeric, fenugreek seed and salt to taste. Grind the mix.
  • Store this in an airtight container in a refrigerator. This can stay for an year if it’s untouched by water.
  • Whenever the thokku is to be used, remove a portion into a bowl, heat some groundnut oil (use the filtered and not the refined oil, this adds to the flavor) and splutter some mustard seeds in it, put this baghar on the thokku and it’s ready to serve. It can also be eaten without the baghar also.
  • Serve it as a chutney or mix it with hot steamed rice and eat.

Did I forgot to mention that S had asked that filtered oil to be parcelled here from BLR…. One can surely understand that we are all gluttons in the family.

reade more... Résuméabuiyad

Winter Special- Makke Di Roti Aur Sarson da Saag (Corn Meal Bread and Mustard Leaf Curry)

clip_image002
Hello!
When we say winter the first thought of  food that comes to any ones mind here in North India is surely Makke di Roti and Sarson da Saag. Punjabis love to eat this and it frequents their kitchen quite regularly in this season.
Traditionally in villages it is made on ‘chulha’ which adds a different flavor and takes the recipe to another level which surely can not be achieved on a gas stove, but living in an apartment Chulha can not be thought of…
Talking about Mustard leaf, it is a member of the cruciferous vegetable family. It shares the same cancer-preventing benefits of broccoli, cabbage and kale. Mustard is a pungent winter vegetable, abundantly available in this season. It contains large amounts of beta carotene and vitamin C that are important antioxidants. Mustard greens are also a source of calcium that can be important to lactose intolerant individuals. Mustard greens also contain a significant amount of iron.
Mustard greens can be eaten raw or cooked. The whole plant can be cut at once or individual outer leaves can be picked for a cut-and-come-again harvest. The young leaves, four to five inches long , are mild-flavored and can be eaten raw in salads. The older leaves taste better when prepared as cooked greens.
Makke di Roti can be made in various variations…like the plain, methi (fenugreek) and mooli (radish) and can be eaten with green chutney and butter also.
Ingredients For Sarson Ka Saag
5 cups chopped Mustard greens
1-1/2 cups chopped Spinach Leaves
2 onions chopped
5-6 garlic pods
1-1/2” ginger piece
8-10 green chilies chopped (check the spiciness)
2-1/2 tbsp corn meal
2 tsp coriander pwd
1 tsp red chili pwd (optional)
2-3 dry red chilies
clarified butter for cooking
Method
Wash the greens with plenty of water to remove the dirt and soil and then chop finely.
Chop finely the ginger, garlic, onion and green chilies.

clip_image002[5]
Take a deep pan and take 7-8 cups of water in it, put some salt. Once the water starts boiling first add the mustard greens let it cook for a minute and then add the spinach and cook for another minute. Remove the greens and put them immediately in cold water, this stops further cooking of the greens and keeps the green colour intact. Another precaution that should be taken is never close the vessel in which the greens are either boiled or cooked.
P1010865
P1010866
Grind the greens.
P1010868
Heat 5-6 tbsp of ghee in a pan. Add chopped onions and saute, when it turns translucent add ginger-garlic and saute for a minute and then add green chilies. Add salt to taste and coriander powder, saute till the onions are nicely brown in colour now add the corn meal and let the meal get nicely roasted for a few minutes  till a nice aroma is produced. The corn meal acts as a binder.

clip_image002[7]

Now add the green leaf paste, mix thoroughly and bring it to a boil. Adjust the consistency by adding some water.
P1010878
P1010879
Heat a spoon of ghee in a separate small pan and add dry chilies and red chili pwd. Pour the baghar immediately on the saag.
P1010880
Serve hot with some home made butter on top.

clip_image002[15]clip_image002[9]

Ingredients For Makke di Roti
2 cups Corn meal
1/2 cup grated radish
2 green chilies chopped
salt to taste
hot water for kneading the dough
Method
As I have explained earlier that this roti can be made in various variations. Here I am making with radish. Take  the cornmeal in a large plate, add radish, green chilies and salt to taste and mix thoroughly. The radish releases it’s water. Now add hot water (hot enough that your hands can handle) and make a dough. Every time we start making the roti take a small portion of the dough (small orange size) and knead it again properly. This helps in making soft rotis with smooth edges.
P1010881
P1010882
Traditionally the roti is made using hands and that surely needs expertise, I make in a simpler way by patting  and moving it using flour and this method can be further simplified by patting it on a plastic sheet and then lifting the plastic sheet away from the roti. This method is good for beginners.
1.P1010883
2. P1010887
After lifting the roti put it on a hot tava/girdle and cook from both the sides and then put a spoon of ghee and shallow fry the roti.
P1010888
P1010889
P1010890
Cut it into quarter pieces and serve it with the saag along with some jaggery, radish, a piece of lemon and green chili.
Here’s how the platter looks like
clip_image002[11]
Sending this to Monthly Mingle:Winter fruits and vegetables hosted by Cook like a bong and started by Meeta.
reade more... Résuméabuiyad

Soybean and Rice Adai

clip_image002
Hi Friends.
Now that I felt rejuvenated after enjoying a fun filled long weekend with my family, I decided to clean my pantry and to take a stock check of what all I have in there and clean up the mess if any (a part of my resolution for this year..not to let the grocery go waste).
While doing the stock check I found that I have very good quality Soybeans which were completely neglected by me. This packet of beans looked at me very angrily and castigated me to overlook it’s presence, not fair, not fair it said. So in the urge to finish these extremely healthy and nutritious beans I soaked them all overnight without thinking what I will do with them (did I decide that I will plan out things well in advance as a part of my new year resolution?). I just told myself I will make something interesting.
Just before I decided to retire to bed I was attacked by another thought… I have not thought about breakfast. These days I plan and keep my veggies and other ingredients ready for morning as I feel too lazy to come out of the comforter…so cold it is!!!!! Instantly with no second thoughts I decided to soak some rice….Yes, you guessed it right! I surely had Adai in my mind.  I did think wisely, right!!!Smile 
 Adai are Indian pancakes made from rice and legumes. It’s a  kind of Dosa and very popular in Tamilnadu. These pancakes have a crisp outer texture and are soft inside. Served with Chutney or Podi they make a filling breakfast/ lunch/ dinner.
Health facts
Soybeans are extremely nutritious, it contains carbohydrate, fat, protein, vitamins, minerals like calcium, folic acid and iron. The protein in soybean has all the essential amino acids that is adequate for human health. It has high lecithin content and is therefore excellent for mental fatigue and for protection against cholesterol deposits. Lecithin is a brain food, a tonic and energizer.
I found this as a good way to provide a PROTEIN PACKED MEAL for the kids, an ideal way to add soybean to our diet.
As I have mentioned that I soaked things without any measurements so I am providing you with approx quantities.
Ingredients to grind
1 1/2 cups of soaked soybeans (approx)
2 cups soaked rice (approx)
5-6 green chilies
1-tsp cumin seeds
1-1/2 inch piece ginger
 to add to the batter
2 chopped onions
1 tsp cumin seeds
2 tsp pounded fennel seeds
chopped cilantro (optional)
salt to taste and
oil for cooking
clip_image002[10]
Method
Grind together soybeans, ginger, green chilies to a  paste ( keep it a little coarse).
Grind rice separately to a not so fine paste.
Mix the two and add all the other ingredients. I would definitely recommend the addition of fennel seeds which imparts excellent taste to this Adai. Add water to adjust the consistency of a dosa batter.
P1010807
Heat the girdle and smear it with some oil. Take a ladle full of batter and spread it in concentric circles. These are not made very thin and are slightly thicker than the normal dosa.

P1010805
With the help of an oil dropper spread some oil in the centre and the sides. When one side is done and is nicely golden brown in colour flip and cook  the other side. The edges of Adai are not as even and smooth as that of a Dosa, so do not panic..

P1010806  
When both the sides are done, serve it hot with with coconut or any other tangy, spicy chutney of your choice.
clip_image002[8]

Do I really need to tell you that these are very very tasty and quite filling too….Thumbs-up. I am surely ready to make them again!!
Sending this as my entry to EC’s MLLA-19 the brainchild of Susan    , to CFK-creative food for picky/fussy eater’s Hosted by Sara and is the brainchild of Sharmi of Neivedyam and to Srivalli’s Kid’s Delight – Wholesome Breakfast.
reade more... Résuméabuiyad