Pages

.

Basil Pesto Parathas


          I need not mention again and again how much I like basil, simply love it in all forms, fresh or dry. I like to use the fresh leaves or in their absence, the basil pesto, now available in Chennai too. Apart from using it in pasta and in sandwiches, I wanted to try out something else with it. So this Sunday, I tried out these parathas with it, you can use the store bought pesto or make your own, recipe here. They are very easy to make and very flavorful..

Need To Have

  • Whole Wheat Flour - 1 + 1/2 cups
  • Basil Pesto - 1 + 1/2 tablespoons

Method


          Add the pesto to the flour and mix it, then add water little by little and make a soft dough, keep it covered for 1/2 an hour. Divide the dough into 8 balls, roll it out into round discs.


           Place one on a hot skillet, when the bottom side gets light brown spots, flip it over. When the other sides gets nice brown spots, remove it and put it on the special phulka plate (the side with the dark brown spots facing up) or directly on the flame. When it puffs up slightly, remove it and serve it with any curry.


Note
If your homemade pesto or store bought pesto is too grainy ( nutty) grind it slightly before adding it to the flour, otherwise it might be a little difficult to roll out.
The rolled out parathas will be like slightly thick tortillas.
I didn't add any salt as the pesto itself has enough salt in it.
The olive oil and the cheese in the pesto is enough, but if you feel you need more oil, apply some olive oil on the cooked parathas before serving.
reade more... Résuméabuiyad

Soya Shami Kebab… For Vegetarians Who Want To Indulge In Non Veg Delicacies, Step Wise


DSC_2320-001
Hello!
Today I’m back with my favorite, the kebab. My regular readers would know my love for the kebabs. There was a time when I used to post kebab recipes very regularly and I did realize that I have not posted any, in the last few months. So like getting back to active blogging I tried to get back to making some kebabs too..
Since, the theme of ‘Only’ event for this month is Soya hosted by Preeti, I wanted to indulge in a soya kebab. Texturally, soya has  quite a close resemblance to meat and that comes to the advantage of the vegetarians who want to indulge into non-veg delicacies, in a vegetarian way. I’m amongst them and hence I do use soya to replace meat.
Today I have indulged into a very popular kebab,  the Shami Kebab. Shami kebab literally means Syrian kebab (Sham) in Arabic. This kabab almost appears like a patty or cutlet which is pan fried and served with mint or coriander chutney, sliced onions and lemon juice. It is a nutritious and healthy kebab. This kebab is extremely popular in India, Pakistan and Afghanistan.
A typical shami kebab  is made of minced mutton, ground Bengal gram (chana dal) and spices. It can be made with any meat either the beef, chicken or mutton but a traditional Shami Kabab made from mince meat are round patties filled with spicy surprises and the tangy `kairi’ or raw green mango. The uniqueness of this kebab is the masala which is a zealously guarded family secret and prepared by women in the royal family. Shami kebabs are royally prepared during the Iftar parties during the Ramzan season or on Eid days along with sheer kurma.
There are various theories regarding it’s origin.  i) Some are of the opinion that these kebabs were introduced to South Asia during the Mughal Era by Muslim emigrants from the Middle East. They had employed cooks from all over the Muslim world to serve in the royal kitchens. Some of the cooks were from Syria as well. ii) The second theory states that the word Sham is evening in Hindi and Urdu and Sham-e-Awadh means an evening in Lucknow of yore since the time of Nawab regime. iii) The third theory says that  Shami Kababs had originated from the famous village of Sham Churasi in the Hoshiarpur district of Punjab. ( Reference Wikipedia and VahReVahChef)
Since it is authentically made using meat, this is my take on making a veg and vegan version. I’ve avoided the use of clarified butter in cooking the kebabs but those who do not mind indulging in more calories, do not hesitate to use the ghee. The veg kebab might not be as succulent  as the non veg version as soya does not have any fatty tissues to it plus it can not be ground as fine as the meat, but flavor wise this kebab rocks. It is almost as good as a meat kebab.

Soya Shami Kebab

DSC_2318-001

Soaking Time: 1hour

Preparation Time:20mins

                    Cooking Time:2-3mins per Kebab

Makes: about24

Serves:6

Ingredients

20oz Soya Granules
1 medium onion roughly chopped
1/2cup soaked Bengal Gram/ Chana dal
2tbsp coriander powder
juice of half lemon
a large pinch garam masala
2tsp red chili powder
2tbsp oil
oil for shallow frying
cornstarch
1-2 bread slices/bread crumbs

Whole Spices

2red chilies
5-6 green cardamom
1black cardamom
2 small pieces cinnamon
8-10 black peppercorns
DSC_2334-001


Method

DSC_2274DSC_2275
Soak the soya granules for 15-20mins and Bengal Gram for an hour, in water. Drain the water from the lentils. Take a muslin cloth and transfer the soya granules to it. Press and squeeze out all water.
DSC_2277
Heat oil in a pan and add all the whole spices. Keep the flame low, so that all flavors infuse into the oil.
DSC_2278DSC_2280
Add the chopped onion and sauté.
DSC_2281
Add the soaked and drained Bengal gram, mix.
DSC_2282DSC_2283
Add the soaked and drained soya granules and mix on high flame to remove all the remaining water.
DSC_2285
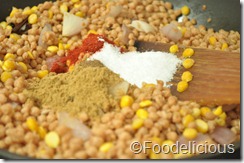
Add the garam masala, chili powder, coriander powder and salt. Mix and cook for two more minutes.
DSC_2286DSC_2287
Cool and add bread slice and lemon juice.
DSC_2290
Remove all whole spices and put them in the mixer and grind. Add the soya mix and grind to a smooth paste. While grinding add one or two slices of bread. This helps in binding. Add 2tbsp oil to the mix, this helps to avoid the dryness of the soya and makes the kebab more succulent.
DSC_2292
Add the cornstarch to small portions of the mix at a time. Add enough cornstarch so that the kebabs do not disintegrate while frying. The quantity of cornstarch will completely depend on the moisture content in your mix, hence have not specified the quantity.
DSC_2291
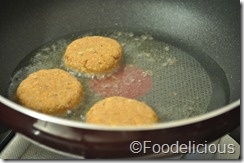
Take small lemon size portion of the mix and with oiled hand make patty with smooth edges. Shallow fry in medium hot oil. While shallow frying ensure that the pan has enough oil to submerge half the height of the patty. Fry on both sides and remove on a kitchen towel.
Serve hot with green chutney, onion slices, lemon wedges and some chaat masala, sprinkled on top. Else roll it inside a roti with some chutney and onion for a filling kathi roll.
DSC_2306-001
reade more... Résuméabuiyad

Vendikkai Thayir Pachadi ( Okra With Yogurt )


          Well, today I am feeling a little lazy, might be it's the end of the week or the beginning of the weekend, whatever the reason, I have chosen a very easy dish today. A simple thayir pachadi or raitha and I love this particular one with vendikkai or okra or lady's finger, I like the ones that we get here in Chennai, they definitely justify the name lady's finger, so slim and long. It's so easy to prepare, serve it as side dish with rice or rotis or parathas..

Need to Have

  • Diced Okra - 1 cup
  • Curd Or Yogurt - 1 cup
  • Mustard Seeds - 1/4 teaspoon
  • Urad Or Black Gram Dal - 1/2 teaspoon
  • Fenugreek Seeds - 1/8 teaspoon
  • Asafoetida - a pinch
  • Turmeric Powder - 1/8 teaspoon
  • Red Chilly Powder - 1/4 teaspoon
  • Salt - to taste

Method


          Heat oil, add the mustard seeds and the urad dal, once it starts spluttering add the fenugreek seeds and the asafoetida followed by the chopped okra. Saute on reduced heat for about 5 mins, till the stickiness from the okra is gone.


         Then add the salt, turmeric and chilly powders, mix and cook till crisp and done. Cool, then mix in the curd and serve.


Note
Use a flat bottom pan, the okra will come out very crispy and crunchy, and let it turn black here and there, the raitha is more tasty that way.
Use chilly powder according to your taste, or you can add chopped green chillies along with the okra and fry till crispy, also you can add some fresh grated coconut to the raitha.
Do not let the fenugreek seeds turn black, it'll taste bitter.
reade more... Résuméabuiyad

Tofu Broccoli With Basil


          Back in the US, my daughter and I would frequent a Chinese restaurant, close to home. Of course being vegetarians, we had very few options, the usual lo mein and fried rice, but once I was surprised to find basil in the lo mein (noodles). It gave such a nice flavor and blended well with Chinese style of cooking. I had wanted to try it at home, so this time when I did a stir fry with broccoli and tofu, I used basil ( was so happy that we can get basil now in Chennai). It turned out very good, if you love basil like me, then you should definitely give this a try..
Need To Have

  • Toasted Extra Firm Tofu Cubes - 1 cup
  • Broccoli Florets - 1 + 1/2 cup
  • Onions - 2 medium sliced
  • Red Chilly Powder - 1/4 teaspoon
  • Soy Sauce - 1 teaspoon
  • Basil Leaves - 1 handful or 1/4 cup packed chopped

Method


          Blanch the broccoli florets ( add to boiling water for 2 minutes and rinse in cold water). Heat some oil, add the sliced onions, saute till it turns pink for about 3 minutes, then add the broccoli.


          Mix, then add the chilly powder, soy sauce, salt and a tablespoon of water, saute for another 5 minutes. Finally add the tofu and the chopped basil, mix well and serve it warm, garnished with some fresh basil.


Note
Toast slabs of tofu and then cube it.
Increase the amount of soy sauce or chilli powder as required, if needed you can add some black pepper powder at the end.
reade more... Résuméabuiyad

Cilantro-Parsley Pesto.. Indian Chutney in an Italian Avatar

DSC_2240-001
Hello everyone!!
I’m back with yet another quick recipe and this time it is not a meal but a dip or in an Indian terminology, a chutney. In India we make chutneys of various kinds dry, wet, with oil, without oil. If we start looking out for various chutneys of different regions in India, thousands of recipes would surface.
Pesto is also a kind of chutney and has an Italian origin. A traditional  pesto has basil, parmesan cheese, olive oil, pine nuts and garlic. The word pesto  has originated from the word ‘Pestare’ which means ‘to pound’. But traditionally the pesto is not pounded but ‘ground’ in the pestle and mortar.  Traditionally a   Pesto is made with basil but today a variety of Pesto using different ingredients are available.

In India every household has it’s own chutney recipe and of all the chutneys made, coriander chutney is most common. This coriander chutney can also be made in various ways and one of the ways also makes use of peanuts. While making this peanut version of coriander chutney, it suddenly occurred to me,  that with a few changes in this chutney I could convert  it into an Italian preparation.  I experimented with my thought and gladly I succeeded too and this version  of coriander pesto  was produced. It turned out a far cheaper version as compared to the Basil Pesto, as pine nuts as well as the   basil leaves are very expensive here. I served the pesto with home made herbed bun and I must say, it was a great combination to eat.

Cilantro-Parsley Pesto

DSC_2251-001

Preparation Time:10mins

        Serves:4


Ingredients

a small handful cilantro/ coriander/ hara dhaniya
a small quantity of parsley
2-3tbsp roasted and peeled peanuts/ bhuna mungfali dana
3-4 plum garlic cloves/ lahsun
1/4cup extra virgin olive oil/ jaitun ka tel
about 4tbsp parmesan cheese
1/4tsp of salt

Method

In a mixer pot take washed cilantro and parsley leaves.   Add garlic to it.
DSC_2203
Add roasted peanuts.
DSC_2204
Add cheese, salt and olive oil. The cheese also has salt so less salt is added.
DSC_2207
Grind to a coarse paste.
DSC_2208
Serve as a sandwich spread or a dip.
DSC_2242-001
This dip can be stored in an air tight container for about 8-10days in a refrigerator.
reade more... Résuméabuiyad

Tri Color Capsicum Rice


          I always have a stock of capsicums in my refrigerator, love its flavor, adding a small piece of it to any dish makes it more flavorful. We can also make so many dishes with capsicum alone, starting from sambars to curries and pilafs. Today's dish is a rice preparation, you can make this with just the green capsicum alone, but since I also had a red and yellow one , I added a little of each one of them, making it very colorful..

Need To Have

  • Basmati Rice - 1 cup
  • Red Capsicum - 1/2 chopped or sliced
  • Green Capsicum - 1/2 chopped or sliced
  • Yellow Capsicum - 1/2 chopped or sliced
  • Tomato - 1 chopped
  • Mustard Seeds - 1/2 teaspoon
  • Cumin Seeds - 1/2 teaspoon
  • Urad Or Black Gram Dal - 1 teaspoon
  • Curry Leaves - 10

Roast And Powder

  • Coriander Seeds - 1 tablespoon
  • Chana Dal - 1 tablepoon
  • Peanuts - 2 tablespoons
  • Dried Red Chillies - 2
  • Cinnamon - 1" piece

Method
          Wash and soak the basmati rice for 1/2 an hour, drain and cook it with 2 cups of water, salt and a teaspoon of oil, cool it. Roast everything together except for the peanuts ( roast separately, and remove the skin), make a coarse powder with everything.


          Heat some oil, add the mustard, cumin seeds and the urad dal, once it starts spluttering add all the capsicums, saute for about 4 or 5 minutes. Then add the tomatoes and saute till the tomatoes break down and the peppers are cooked, do this on reduced heat.


          Once the peppers are cooked, add the powder, mix it for a minute or two, add the curry leaves. Finally add the cooked rice, mix everything well on reduced heat, remove and serve warm with any raitha or even plain curds.


Note
If needed, cover and cook the capsicum ( if it becomes too dry).
The grains should be separate in the cooked rice, not mushy and sticky.
You can also add some cooked chickpeas along with cooked capsicums, makes it more tasty.
reade more... Résuméabuiyad

Chana Dal Pilaf/ Khichadi; Winner Of Only Cooking From Royal Kitchen


DSC_2177-001


Hi All!
There are always days when you are not in a mood to cook an elaborate meal and what one is looking forward, is to have a one pot meal which is healthy and filling. I was also in such a mood today. For an unknown reason my right leg muscle has got pulled and I am not able to walk properly, so wanted to cook something very quick without straining the leg. S, was also going to come home for lunch as he has to travel on work for a few days, so I had to cook, there was no option of escaping..

I postponed cooking as much as possible and then finally I pushed myself into the kitchen a little before the noon. I was still undecided. S, had told me that he would eat khichadi but I was in no mood to eat the regular moong dal khichadi. I wanted to eat something different and yet simple…
I rummaged through my containers to see if anything excited me.. in this process I spent another 15mins and my leg started talking to me. I had to think fast and cook quickly too..Finally I landed myself on the chana dal (Bengal Gram) and decided to make a rice preparation with it which could be called a khichadi or a pilaf. I guess I had read this recipe somewhere while surfing cookbooks at landmark and the recipe got imprinted in my brain for it’s simplicity. I do not remember whether the preparation was a pilaf or khichadi but for me the thought of cooking Pilaf satisfied me..I was not going to have khichadi. What  I was cooking  was a kind of  khichadi made pilaf style..basically I was cooking with rice and lentils but the taste and texture had to be of the pilaf.
I did not add any turmeric to my preparation as I wanted the yellow grains of the Bengal Gram to shine through the white grains of the rice. I also added very less spices and concentrated more on the aroma and flavors. I wanted it to have subtle taste which would just play lightly on my palate and to my delight I achieved it too..the khichadi/pilaf was an unusual combination for me with light flavors and a beautiful aroma, I loved the preparation to the core and so did S..I know, I’ve run into one jackpot recipe which is also a one pot meal ..it’s a simple preparation which most of the people would like to eat and cook!!StarRed heart
I served it with a quickly made, tomato cucumber raita and jackfruit pickle.

Chana Dal Pilaf/ Khichadi

DSC_2181

      Serves:3

   Soaking Time: 1hour

Preparation Time: 10mins

     Cooking Time: 15mins


Ingredients

1cup Bengal gram (soak for an hour)
1cup rice (soak for half an hour), I used small grain rice
5-6pepper corns (add more if you like spicy)
2-3cloves
a small pinch of asafetida mixed with water
about 4 to 5cups of water ( as per your rice quality)
salt to taste
For Tempering
1-2bay leaves
2tbsp oil
2tbsp ghee/ clarified butter
one onion sliced
1/2tsp cumin

DSC_2182-002

Method

Soak the rice and dal for the mentioned time. Do not add excess water for soaking, it should just enough to dip the lentil and rice.
In a pan heat oil and ghee (one can use only ghee or only oil, choice is yours).
P1080434
Add the cumin and let it splutter.
P1080435
Add the bay leaf.
P1080436
Tip in the onions.
P1080437
Crush the pepper and cloves together and add to the onions, mix.
P1080438
Add salt to taste, mix.
P1080441
Once the onions are cooked, add the rice and lentil and saute for a few minutes. Also add the asafetida mixed in water.
P1080443P1080444
Add boiling water the rice-lentil mix. Cook covered till done. (Give quick stirs while cooking). Ensure, that you have not added excess water unless you prefer your rice mushy..
P1080449P1080451P1080452
Serve hot with raita and pickle. If you, like you can also add a little ghee on the top of the pilaf.
DSC_2168-001


Coming to the winner of ‘Only’ Cooking from the Royal Kitchens, out of the 58 Indian entries sent to Divya, I’ve picked the winner. I’ve followed my principle of picking a winner who is also a follower of my blog Publically and not picked from those who do not follow my blog publically.
The random number that I got who is also a follower of my space is no.26, which was a post on Khajur pak posted by Sanoli Ghosh. Congrats Sanoli, you will receive a book on Punjabi Subzis from www.tarladalal.com, who are the sponsors of the event giveaway. Please mail me your address with a landmark, pin code and also your landline/cell number to cookingoodfood@gmail.com within two days. In case Sanoli is not able to claim her win, I’ll pick another winner after two days.
I hope you enjoy reading my posts, your feedback is always awaited!!! Will meet you all in my next post, till then see you..
reade more... Résuméabuiyad